Azure Local | HomeLab – SFF – Hyper-V – Part I
 Alex ter Neuzen
On this page
Azure Local has a new flavor: small form factor, or SFF for short, currently still in preview. Where classic Azure Local runs on validated servers with Azure Stack HCI OS and Storage Spaces Direct, SFF targets small edge devices. It doesn’t run Windows but Azure Linux, and there is no deployment wizard to click through. You boot a maintenance environment, claim the device in Azure with an ownership voucher and let Azure install the operating system through Arc. After that, you run container workloads on it, such as K3s, AKS or Azure IoT Operations.
Not everyone has a supported NUC sitting on their desk. Fortunately, Microsoft also describes how to test SFF in a Hyper-V VM. That is explicitly meant for testing and evaluation and not for production, but for a lab it’s exactly what you need.
This is part 1 of a series in which I deploy Azure Local SFF and eventually run Azure IoT Operations on it. In this part we prepare the subscription, build the VM and retrieve the ownership voucher. Along the way I ran into a clock problem that made Azure refuse my voucher for two hours, so I also show how to avoid that before the VM boots for the first time. In part 2 we claim the machine in Azure and let it install Azure Linux.
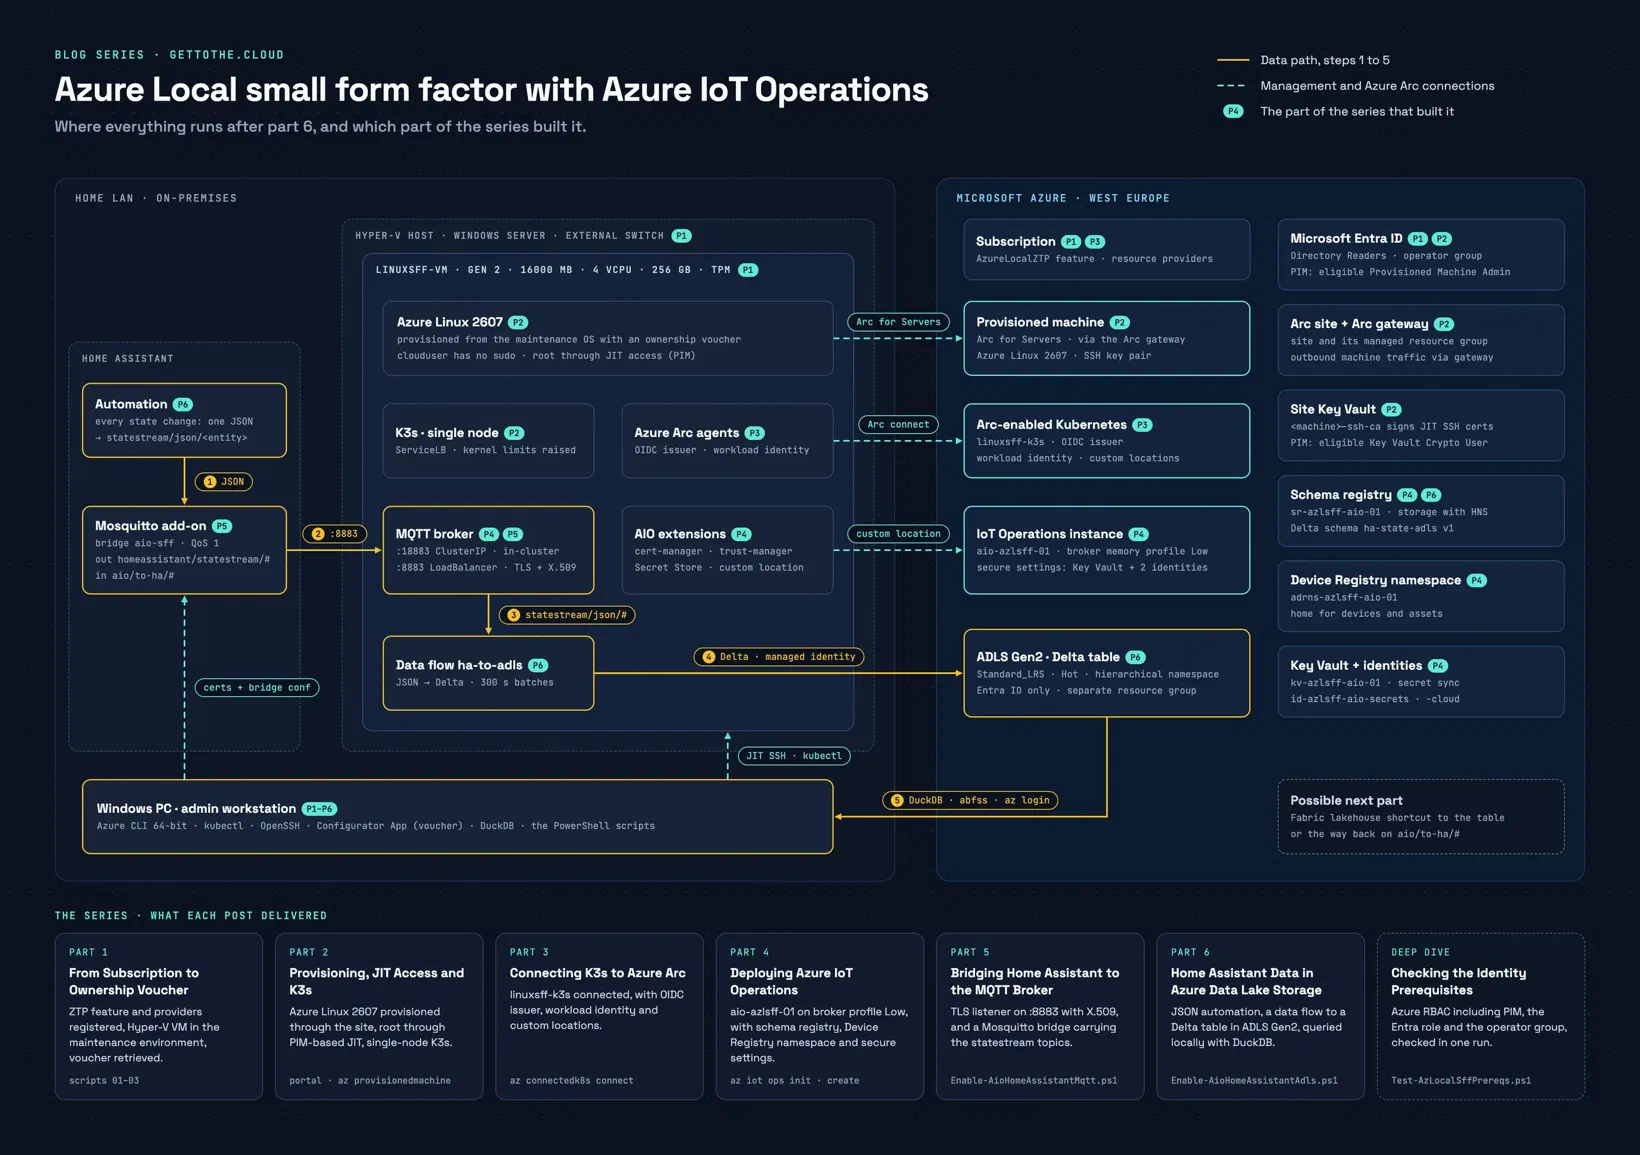
After the next 6 posts, I have covered the architectural design below.
What you need#
On the local side you need a Windows machine with Hyper-V and enough room for a VM with 16 GB of memory, 4 vCPUs and a 256 GB disk. You also need a network on which the VM gets an address through DHCP and can reach the internet. I use an external switch on my LAN for that, more on that later.
On the Azure side, identity is what matters most. In the preparation guide, Microsoft asks for the following permissions and objects.
| Components | Requirements |
|---|---|
| Azure RBAC | Owner, or Contributor plus Role Based Access Control Administrator, active and permanent |
| Microsoft Entra | At least the Directory Readers role |
| Operators | An Entra security group with the people who manage the machines |
| Tooling | Azure CLI, signed in with az login |
Note that “active and permanent” is meant literally. If you use PIM, an eligible role only counts after you’ve activated it.
Step 1: Prepare the subscription#
SFF relies on zero-touch provisioning, which sits behind a preview feature. You register that first, together with the resource providers the provisioning process uses.
$sub = '<subscription-id>'
az account set --subscription $sub

az feature register --subscription $sub `
    --namespace Microsoft.DeviceOnboarding --name AzureLocalZTP
The Azure CLI then tells you to register Microsoft.DeviceOnboarding again once the feature shows Registered. That usually takes a few minutes, so I let a small loop wait and do that registration right after.
do {
    $state = az feature show --subscription $sub `
        --namespace Microsoft.DeviceOnboarding --name AzureLocalZTP `
        --query properties.state -o tsv
    Write-Host "$(Get-Date -Format HH:mm:ss)  AzureLocalZTP: $state"
    if ($state -ne 'Registered') { Start-Sleep -Seconds 30 }
} until ($state -eq 'Registered')

az provider register --namespace Microsoft.DeviceOnboarding --subscription $sub
Next, the resource providers. You always need the first eight. The last four are for K3s, AKS Arc and Azure IoT Operations, and since that’s where this series is heading, I register them right away.
$providers = @(
    # Always required
    'Microsoft.Edge', 'Microsoft.AzureStackHCI'
    'Microsoft.HybridCompute', 'Microsoft.Compute'
    'Microsoft.GuestConfiguration', 'Microsoft.HybridConnectivity'
    'Microsoft.KeyVault', 'Microsoft.Storage'
    # K3s, AKS Arc and Azure IoT Operations
    'Microsoft.Kubernetes', 'Microsoft.KubernetesConfiguration'
    'Microsoft.ExtendedLocation', 'Microsoft.HybridContainerService'
)

foreach ($p in $providers) {
    az provider register --namespace $p --subscription $sub
}

foreach ($p in $providers) {
    $state = az provider show --namespace $p --subscription $sub `
        --query registrationState -o tsv
    '{0,-40} {1}' -f $p, $state
}
Once everything shows Registered, the subscription is ready.
Step 2: Check your permissions#
Checking your own role assignments in the portal is doable, but with PIM, group memberships and inheritance from a management group it quickly gets messy. That’s why I wrote a script for it: Test-AzLocalSffPrereqs.ps1. It only uses your az login session for the tokens and queries everything else directly from Azure Resource Manager and Microsoft Graph.
The script checks three things. For Azure RBAC it checks whether you have Owner, or Contributor plus RBAC Administrator, and uses the PIM schedule API to see whether that assignment is permanent or only temporarily activated. For Entra it checks whether Directory Readers or a more privileged role is active. For the operator group it checks whether the group exists, is security-enabled, has members and whether you’re a member yourself.
.\Test-AzLocalSffPrereqs.ps1 -SubscriptionId '<subscription-id>' `
    -OperatorGroup 'sg-azlocal-sff-operators'

# Or at the level of the resource group you'll provision into
.\Test-AzLocalSffPrereqs.ps1 -SubscriptionId '<subscription-id>' `
    -ResourceGroup 'rg-sff-lab' `
    -OperatorGroup 'sg-azlocal-sff-operators'
Each check comes back as PASS, WARN or FAIL, with a summary table at the end. Roles you only hold as eligible are called out explicitly, so you know what you still need to activate. If anything fails, the script exits with code 1, so you can also use it in a pipeline. You can find the full script in the azure-local-sff-iot-operations repository on GitHub.
Step 3: Download the Maintenance OS and Configurator App#
You get the two files you need from the Azure portal. Go to Azure Arc, choose Machine Provisioning (preview) under Operations, then Get started and View downloads. Download all gets you both files. Your browser does need to allow multiple downloads, since they arrive separately.
The Maintenance OS is the ISO the VM boots from. This is the maintenance environment (also called ROE in the documentation) that registers the device with Azure and handles lifecycle operations. The Configurator App is a Windows tool you use to connect to that maintenance environment, download the ownership voucher and collect logs.
Put the ISO somewhere Hyper-V can reach it. I use C:Isosprovision-os.iso, and I install the Configurator App on a PC in the same network as the VM.
Step 4: Networking#
The VM needs a network that provides DHCP for the first connection, lets you assign a static IP later and has internet access. Microsoft provides set-network.ps1 for this, which sets up an internal switch with NAT and DHCP. In my lab the LAN already has DHCP and internet, so I keep it simple and connect the VM to an external switch. A nice side effect: the VM simply sits on your LAN, and you can use the Configurator App from any PC on that network.
First check whether you already have an external switch.
Get-VMSwitch -SwitchType ExternalIf not, look up the physical network adapter and create the switch. With -AllowManagementOS, the host itself stays reachable through that adapter as well.
Get-NetAdapter -Physical | Where-Object Status -eq 'Up'

New-VMSwitch -Name 'EXTERNAL' `
    -NetAdapterName '<name of your network adapter>' `
    -AllowManagementOS $true
Expect the host to briefly lose its network connection when the switch is created, because its IP address moves to the new virtual adapter vEthernet (EXTERNAL). So don’t do this over an RDP session on the only network adapter of a remote server.
Step 5: Create the VM#
The documentation walks through the wizard in Hyper-V Manager, but PowerShell makes it repeatable and faster. The requirements are clear: Generation 2, 16000 MB of memory, at least 4 vCPUs, a 256 GB disk, Secure Boot off and a TPM on. That combination stands out, because you don’t often see a TPM without Secure Boot. The maintenance environment needs the TPM for the device identity, while Secure Boot has to be off for the VM variant.
$vm   = 'linuxsff-vm'
$path = 'F:\VMs'
$iso  = 'C:\Isos\provision-os.iso'

New-VM -Name $vm -Generation 2 -MemoryStartupBytes 16000MB -SwitchName 'EXTERNAL' `
       -Path $path -NewVHDPath "$path\$vm\os.vhdx" -NewVHDSizeBytes 256GB

Set-VMMemory       -VMName $vm -DynamicMemoryEnabled $false
Set-VMProcessor    -VMName $vm -Count 4
Set-VMFirmware     -VMName $vm -EnableSecureBoot Off
Set-VMKeyProtector -VMName $vm -NewLocalKeyProtector
Enable-VMTPM       -VMName $vm

Add-VMDvdDrive -VMName $vm -Path $iso
Set-VMFirmware -VMName $vm -FirstBootDevice (Get-VMDvdDrive -VMName $vm)
I deliberately turn off dynamic memory. The documentation only mentions startup memory, but I don’t want a VM that will run container workloads later to fluctuate. Before you start the VM, you can quickly check that everything is set correctly.
Get-VM $vm |
    Select Name, Generation, ProcessorCount, MemoryStartup, DynamicMemoryEnabled
Get-VMFirmware $vm |
    Select SecureBoot, @{n='FirstBoot';e={$_.BootOrder[0].Device}}
Get-VMSecurity $vm | Select TpmEnabled
Step 6: Boot and fix the boot order#
Before you press start, look at the time zone of your Hyper-V host. If it isn’t UTC, the ownership voucher you retrieve in step 7 can end up dated hours in the future, and Azure refuses it until that moment has passed. For me that meant a voucher Azure wouldn’t accept for two hours. The section “The voucher that wasn’t valid yet” further down explains what happens.
The short version: when a VM powers on, Hyper-V gives it the local time of the host as its hardware clock, and the maintenance environment reads that clock as UTC. With the host on UTC, those are the same thing. So I save the current time zone, put the host on UTC and check that Time Synchronization is enabled for the VM.
$hostTz = (Get-TimeZone).Id
Set-TimeZone -Id 'UTC'

Get-VMIntegrationService -VMName $vm
Time Synchronization should show True. It’s on by default for a new VM, and my script doesn’t change it. Keep the host on UTC until you’ve downloaded the voucher and checked the clock in step 7, because the power cycle for the boot order below reads the host clock again.
While the host is on UTC, its own logs and scheduled tasks shift with it, and so does every other VM you power on in that window. On a lab host I can live with that. On a shared host I would plan it.
Now start the VM and open the console.
Start-VM $vm
vmconnect.exe localhost $vm
After about five minutes the welcome screen of the maintenance environment appears. It shows the version, the hostname and the serial number. More important are the lines Network Info, which should show the IP address from your LAN, Connectivity, which should say Online, and Status, with the message Succeeded Maintenance environment setup completed successfully. You don’t need to log in at the prompt below it, because the rest goes through the Configurator App.
Before you move on, there’s one more thing I would take care of: the boot order. The VM currently boots from the ISO first. The troubleshooting page describes a boot loop on physical NUCs when the installation media keeps priority: after every reboot the installer starts again. The machine reboots during provisioning in part 2, so you want to avoid that.
First check whether the maintenance environment is actually on the disk. If more than a few GB is in use, it is.
Get-VHD "$path\$vm\os.vhdx" |
    Select @{n='UsedGB';e={[math]::Round($_.FileSize/1GB,1)}},
           @{n='SizeGB';e={$_.Size/1GB}}
Then make the disk the first boot device. That only works with the VM turned off, and since nothing important runs on it yet, a hard power-off is fine.
Stop-VM $vm -TurnOff
Set-VMFirmware -VMName $vm -FirstBootDevice (Get-VMHardDiskDrive -VMName $vm)
Start-VM $vm
Wait for the Succeeded message again, which now comes from the disk. Do this before you retrieve the voucher, so your voucher belongs to the installation that stays.
Step 7: Retrieve the ownership voucher#
The ownership voucher is a cryptographic document that links the physical device (in this case the VM) to a digital identity. The mechanism is based on the FIDO Device Onboard specification: Azure uses the voucher to authenticate and claim the device before it provisions anything.
Open the Configurator App, enter the IP address from the console and choose Next. Sign in with user edgeuser, choose Password as the method with the password Password1 and click Sign in. These are the default credentials of the maintenance environment from the documentation. Then choose Download Ownership Voucher and save the .pem file.
Treat that file as a secret. A voucher can only be used once: after the claim, the provisioning service rejects a second attempt for the same device. Microsoft recommends keeping the voucher in a secure place until registration succeeds and deleting it afterwards. You also can’t download the same voucher again later. According to the installation guide, a lost voucher means redeploying the operating system to get a new one.
Two quick checks now save you a failed upload in part 2. First, make sure the file you kept really is the voucher. Ownership vouchers and SSH keys are both .pem files, and on my first upload attempt I picked the wrong one. A voucher starts with its own header:
Get-Content .\<serial-number>.pem -TotalCount 1That should return —–BEGIN OWNERSHIP VOUCHER—–. With any other file, the portal answers with four errors in a row, starting with a missing BEGIN OWNERSHIP VOUCHER header and ending with a rendezvous endpoint it can’t extract. They all mean the same thing: wrong file.
Second, compare the clock of the VM with the real UTC time. The maintenance environment accepts SSH with the same edgeuser account, the same way the documentation uses it for SCP:
ssh edgeuser@<vm-ip> "date -u"      # password: Password1
[DateTime]::UtcNow.ToString('u')
Both lines should show the same time, give or take a few seconds. If they do, put the host back in its own time zone:
Set-TimeZone -Id $hostTzIf they don’t, leave the host on UTC and read the next section before you upload anything.
The voucher that wasn’t valid yet#
This is the section I would have liked to read before I started. My first build ran on a host in the Netherlands, on Central European Summer Time (UTC+2), without the UTC step from step 6. The maintenance environment came up fine, the Configurator App gave me a voucher, and when I uploaded it in Add machines using ownership vouchers, the portal refused it:
Certificate is not yet valid.
Certificate 86018A93xxxxxxxxxxxxxxxxxxxxxxxxxxxx489F
with subject CN=Device.AzureLocal, OU=Org, O=Microsoft,
L=MountainView, S=California, C=US
is valid from 2026-10-15 10:56:32Z to 2028-10-14 10:56:32Z.
Current time (UTC): 2026-10-15 09:23:45Z.
Please verify that the certificate is within its validity period
and that your system clock is accurate. If the issue persists,
contact Microsoft Support.
So what is actually going on?
The device certificate in the voucher is valid from 10:56 UTC. But 10:56 was the local time on my host when the maintenance environment finished its setup; in UTC it was 08:56. The VM took the local time of my host and treated it as UTC, which put the start of the certificate exactly two hours in the future. Two hours is my UTC offset. Azure checked against its own clock, saw 09:23 UTC and said: not yet.
The mechanism is old news for anyone who has ever dual-booted Windows and Linux. Windows keeps the hardware clock in local time, Linux expects UTC. In its guide to Linux VM issues on Hyper-V, Microsoft describes it like this: Hyper-V passes the system time to the guest’s real-time clock without any time zone information, and the guest OS decides how to interpret it. In my lab, the maintenance environment signed the voucher with that uncorrected clock.
Simply enabling Time Synchronization doesn’t solve it. It’s on by default, and Microsoft documents that the Hyper-V Time Synchronization service doesn’t correct a VM clock that runs more than five seconds ahead of the host. That is by design. Two hours is well past five seconds.
And the voucher is only the first thing that notices. In part 2 the machine connects to Azure Arc, and certificates and tokens all depend on a correct clock. Microsoft’s time sync guidance for Linux VMs lists failing authentication with certificate-based technology as the first effect of clocks that don’t agree.
Collecting the voucher is easy. Getting the clock right is the part that matters.
Every host east of UTC can run into this, and the wait equals your offset: two hours in the Netherlands in summer, one hour in winter. On a host west of UTC the VM clock runs behind instead. The voucher probably validates then, but I wouldn’t trust a clock that is hours off for the rest of the provisioning either.
Already have a voucher like this?#
Then one check decides what to do. Compare the VM clock with real UTC, using the two commands from step 7.
If the VM is right by now, the problem was limited to the moment the voucher was made. Wait until the time in the error message has passed and upload the same voucher again. Don’t throw it away in the meantime, because you can’t simply download a new one.
If the VM is still hours ahead, it won’t fix itself, and you’ll meet the same clock again during provisioning. Then the quickest route is to start over: remove the VM, put the host on UTC and build it again from step 5.
Stop-VM $vm -TurnOff
Remove-VM $vm -Force
Remove-Item "$path\$vm" -Recurse -Force

Set-TimeZone -Id 'UTC'
The upload failed, so no machine was claimed in Azure and there’s nothing to clean up there. I couldn’t find this behavior in the SFF documentation. If you run into it as well, it’s worth reporting: that’s what previews are for.
Wrapping up#
You now have a subscription with the right features and resource providers, the permissions SFF asks for, a Hyper-V VM with the maintenance environment on your LAN and an ownership voucher in hand. Because the host was on UTC when the maintenance environment created that voucher, Azure should accept it right away. With that, everything is ready for the real work.
In part 2 we create a site in Azure Arc, attach an Arc gateway, upload the voucher and choose Azure Linux 2607 as the operating system. After that it’s 40 to 60 minutes of waiting until the machine shows Provisioned, and then Azure IoT Operations can go on it.