Azure Local | HomeLab – SFF – Provisioning – Part II
 Alex ter Neuzen
On this page
The voucher is in hand. Now Azure gets to do the work.
In part 1 I prepared the subscription, built a Hyper-V VM with the maintenance environment and downloaded the ownership voucher. This part picks up from there: I claim the machine in Azure Arc, let Azure install Azure Linux, connect over SSH and install K3s. That last step is where this part ends, because the next one, connecting the cluster to Azure Arc, deserves its own post.
It sounds like a short list. In practice there’s one step the provisioning flow doesn’t mention: the account you get after provisioning has no sudo. To install anything you need just-in-time access through Privileged Identity Management, and that has to be set up before you can use it. Most of this post is about that.
What you need#
Everything from part 1, plus a few things for the second half of this post.
| Component | Requirement |
|---|---|
| Ownership voucher | The .pem file from part 1, checked for the right header |
| Licensing | Microsoft Entra ID P2 or Microsoft Entra ID Governance, for PIM |
| PIM setup | Owner or User Access Administrator on the resources you assign roles on |
| Key Vault | Key Vault Crypto Officer on the vault the provisioning creates |
| Tooling | Azure CLI and the OpenSSH client on your Windows PC |
The licensing line is the one to check first. PIM needs Entra ID P2 or Entra ID Governance, and without PIM you won’t get root on the machine the documented way.
Step 1: Create the Azure Arc site#
Provisioning starts with a site: the Azure resource that represents the physical location of one or more machines, such as a store or a factory floor. The site also owns a managed resource group, in which Azure later creates the Arc for Servers instance for each machine.
- In the Azure portal, open Azure Arc and go to Operations Machine provisioning (preview).
- On Get started, select Provision.
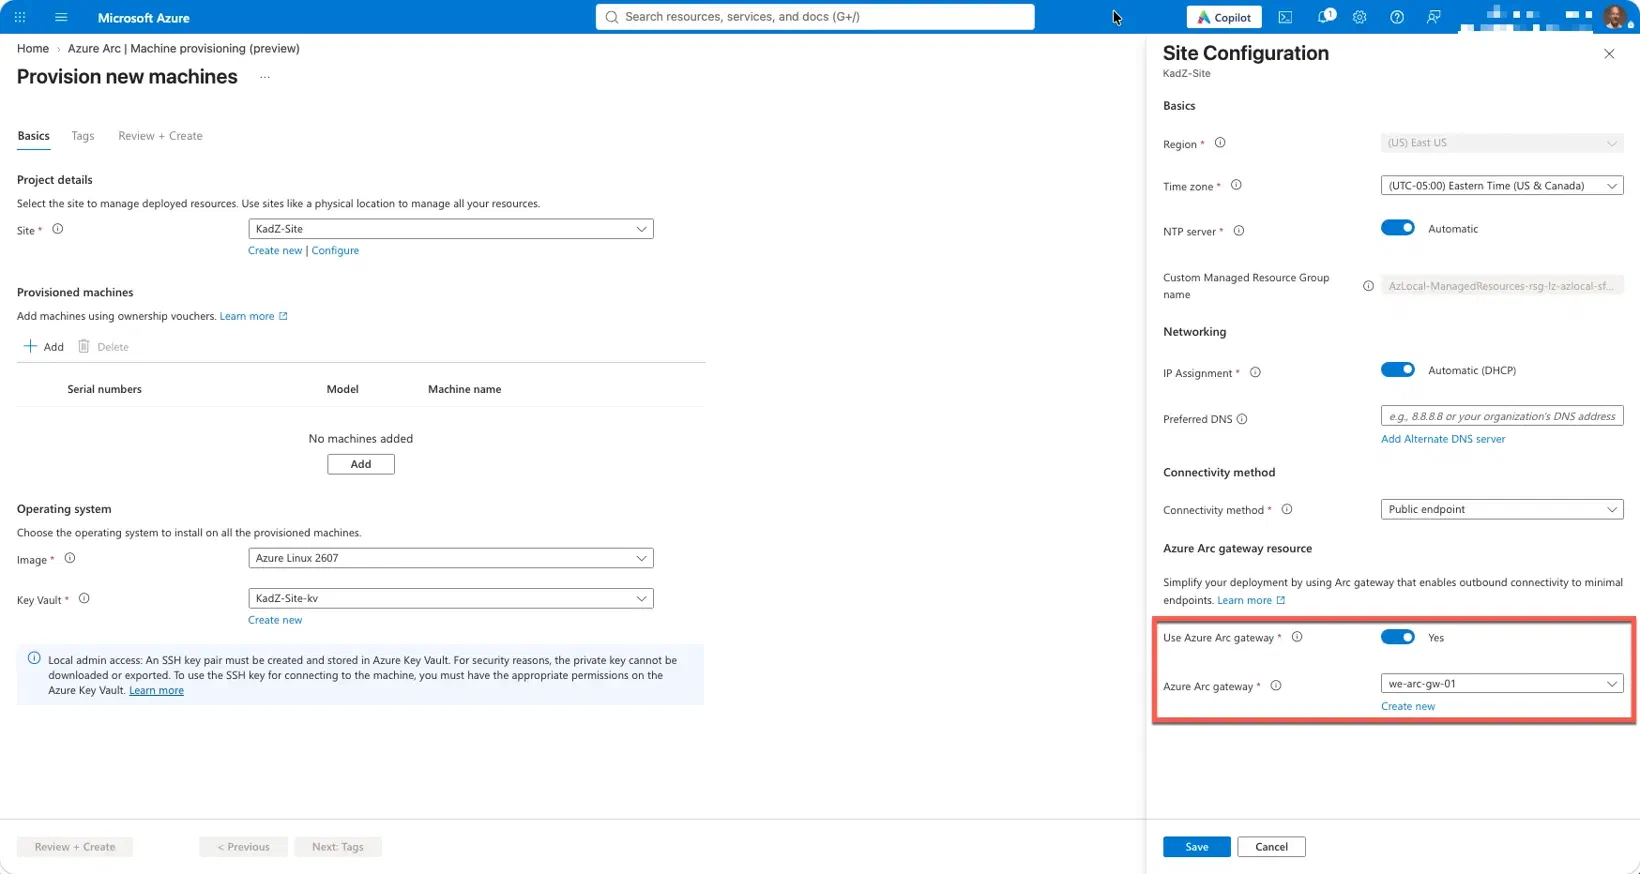
- On the Basics tab, select Create new under site, enter a name, pick the subscription and resource group, and select Create.
- Select Configure under the site.
- Set Use Azure Arc Gateway to Yes and select an existing Arc gateway or create a new one.
- Select Save.
By default Azure creates a new resource group with the same name as the site. I picked my existing lab resource group instead, so everything for this series stays together.
Step 2: Add the machine with the voucher#
With the site in place, you add the machine.
- Under Provisioned machines, select Add.
- In Add machines using ownership vouchers, upload the .pem voucher from part 1 and select Add.
- In the Operating system list, select Azure Linux 2607.
- Enter a name for the SSH key.
- Select Review + create.
The operating system choice isn’t a preference. The documentation is explicit that any other option results in deployment failures later on.
During this step Azure generates an SSH key pair. It installs the public key on the machine and you download the private key. Mine came down as -keyPair.pem, named after the machine. Store it with the same care as the voucher: if you lose it and haven’t set up another method such as JIT, you lose SSH access to the machine. The repository’s .gitignore already excludes .pem for exactly this reason.
If the voucher upload fails with “Certificate is not yet valid”, go back to the clock section in part 1. If it fails with a missing BEGIN OWNERSHIP VOUCHER header, you picked the wrong .pem file.
Step 3: Wait for Provisioned#
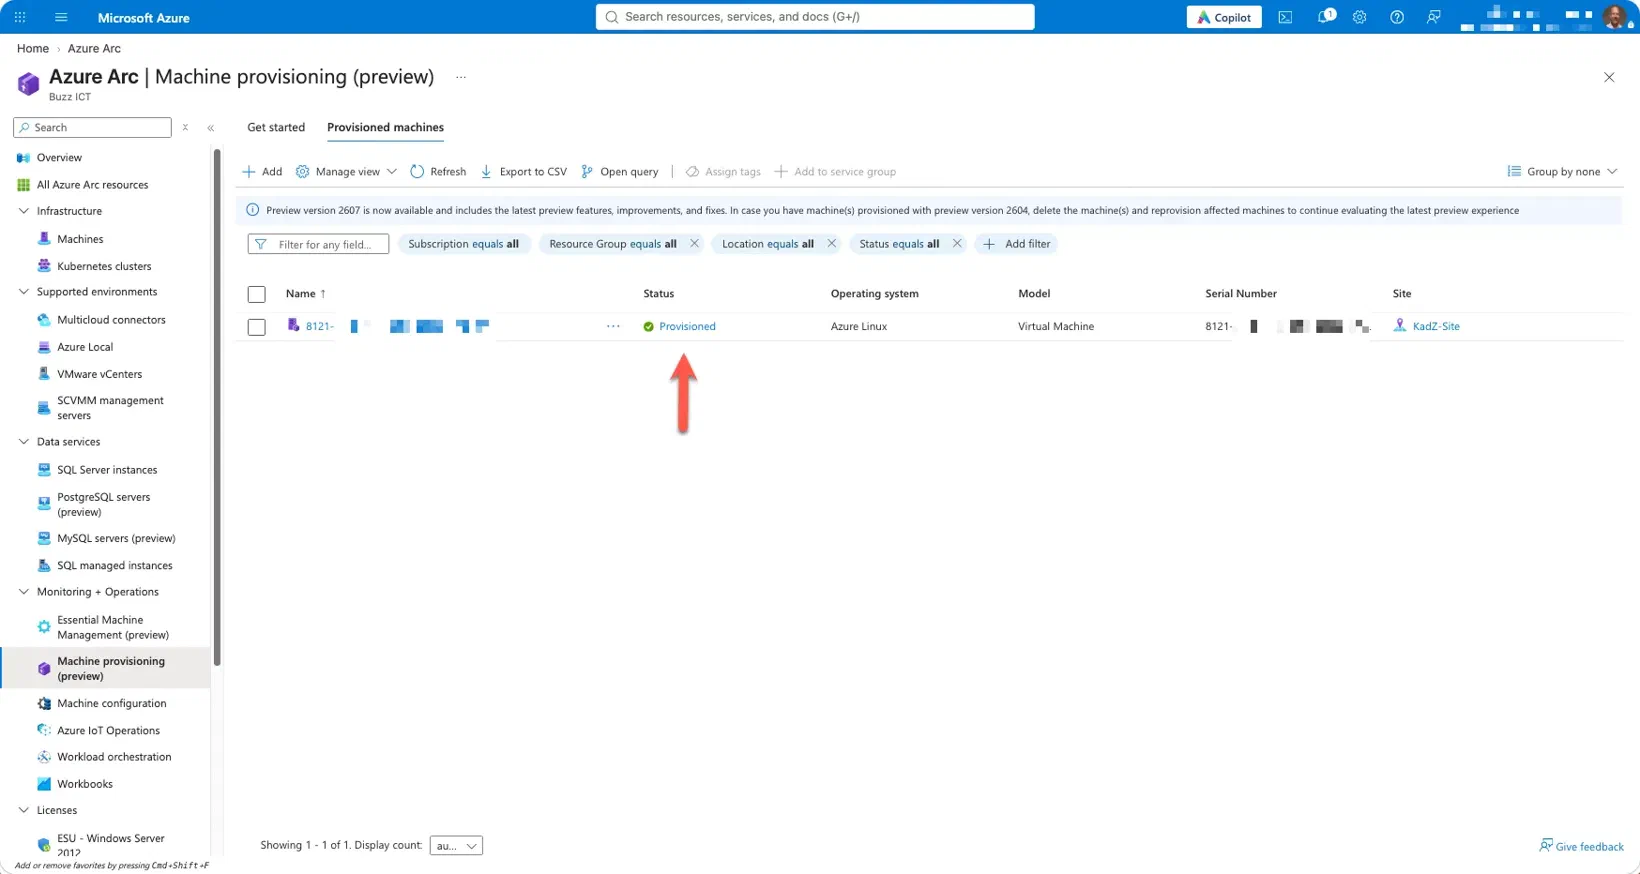
When Review + create finishes, the portal tells you the deployment is complete. That only means Azure accepted the request. The machine itself still has to go through its provisioning lifecycle, and that takes 40 to 60 minutes.
Open the Provisioned machines tab and wait until Status shows Provisioned. Only then is Azure Linux installed and is the machine ready for SSH.
Step 4: First SSH, and the missing sudo#
Before you connect, tighten the permissions on the private key. OpenSSH on Windows refuses a key that other accounts can read, and the troubleshooting guide gives the icacls commands for it.
icacls.exe .\<machine-name>-keyPair.pem /inheritance:r
icacls.exe .\<machine-name>-keyPair.pem /grant:r "$($env:USERNAME):R"
The account on the machine is clouduser. You won’t find that name in the portal; it comes from the documentation, where the examples connect as clouduser@<ip-address.
My first attempt asked for a password:
PS C:\Users\...\Downloads> ssh -I .\<machine-name>-keyPair.pem clouduser@<vm-ip>
dlopen .\\<machine-name>-keyPair.pem failed: Access is denied.
The authenticity of host '<vm-ip> (<vm-ip>)' can't be established.
...
Welcome to Microsoft Azure Linux 3.0 (x86_64)
(clouduser@<vm-ip>) Password:
Look closely at the command. That is a capital I, not i. With -I, OpenSSH treats the file as a PKCS#11 library and tries to load it, which explains the dlopen error. The key is never offered, so SSH falls back to a password. And clouduser doesn’t have one.
That last point is worth remembering. When SSH asks clouduser for a password, key authentication has failed, whatever the cause.
With a lowercase -i the next attempt got Connection closed by <vm-ip port 22, without any prompt. A minute later the same command worked. My best guess is that the SSH daemon briefly held my failed password attempts against my IP address; recent OpenSSH versions do that by design. If you see the same, wait a moment and try once, rather than hammering the command.
ssh -i .\<machine-name>-keyPair.pem clouduser@<vm-ip>Then the first command I ran on the machine:
clouduser@<machine-name> [ ~ ]$ sudo -v
...
[sudo] password for clouduser:
Sorry, try again.
[sudo] password for clouduser:
sudo: 1 incorrect password attempt
So clouduser is a regular user without sudo. That’s fine for looking around, but K3s installs services and writes system files, and the K3s instructions for small form factor say as much: installing K3s requires elevated permissions. Those same instructions point to just-in-time access for the SSH connection, and that’s the route to root.
Don’t keep guessing passwords at the sudo prompt either. There is no password to guess, and every failed attempt counts against the account.
Step 5: Set up just-in-time access#
JIT access gives you a temporary SSH account on the machine, jit, authenticated with a short-lived certificate. Azure Key Vault signs that certificate, and PIM decides who may ask for one and with which rights.
Two PIM roles exist for the provisioned machine:
| Role | What you get |
|---|---|
| Provisioned Machine Admin | SSH access with sudo |
| Provisioned Machine Contributor | SSH access without sudo |
The setup is a one-time job with three parts. Think of it as creating the roles before you can use them: an eligible assignment that nobody has activated gives no access at all, and an activation without an eligible assignment is impossible.
Create the CA key in Key Vault#
The provisioning flow already created a key vault for the site. JIT uses a signing key in that vault as the certificate authority for the machine: the machine trusts SSH certificates signed by it, and the private key never leaves Key Vault.
First, give yourself the data plane rights to manage keys. Being Owner on the subscription doesn’t include those.
az keyvault list --query "[].{name:name, rg:resourceGroup}" -o table

$vaultId = az keyvault show -n <vault-name> --query id -o tsv
az role assignment create --assignee <your-upn> `
    --role "Key Vault Crypto Officer" --scope $vaultId
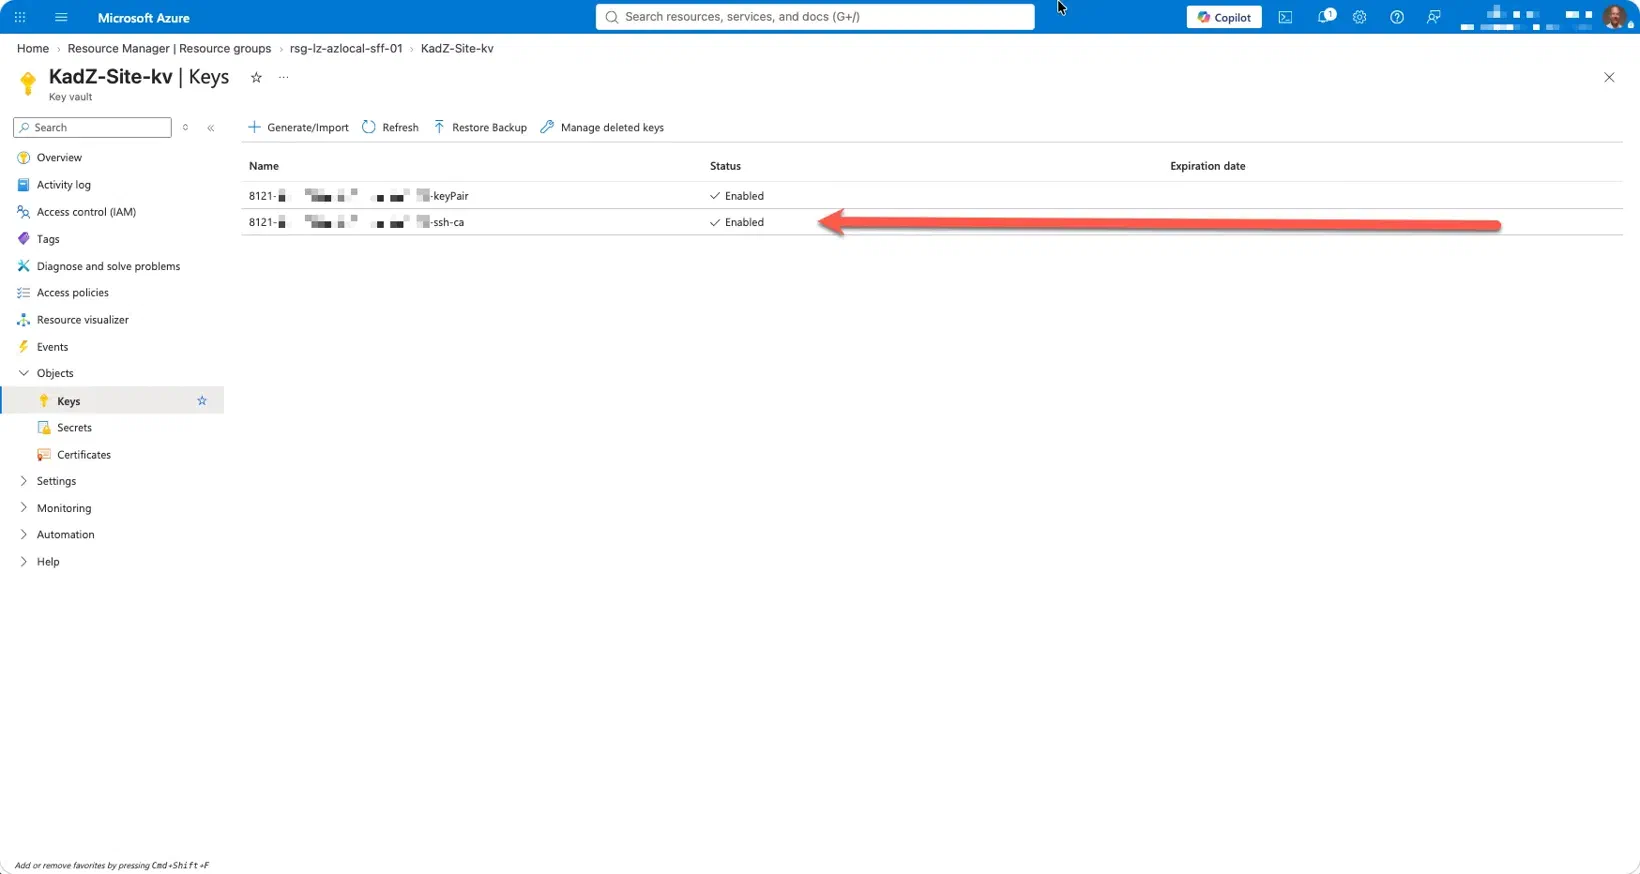
Then, in the vault, open Objects Keys and select New. The documentation says to import the key that was created during the provisioning flow and to name the new key -ssh-ca. Afterwards the vault holds the original key pair and the new -ssh-ca key.
Create the eligible PIM assignments#
Now the roles. Assign them as Eligible, not Active. That is the whole point of JIT: nobody holds root on the machine until they ask for it.
- Open Microsoft Entra Privileged Identity Management Azure resources.
- Select the provisioned machine resource, then Assignments Add assignments.
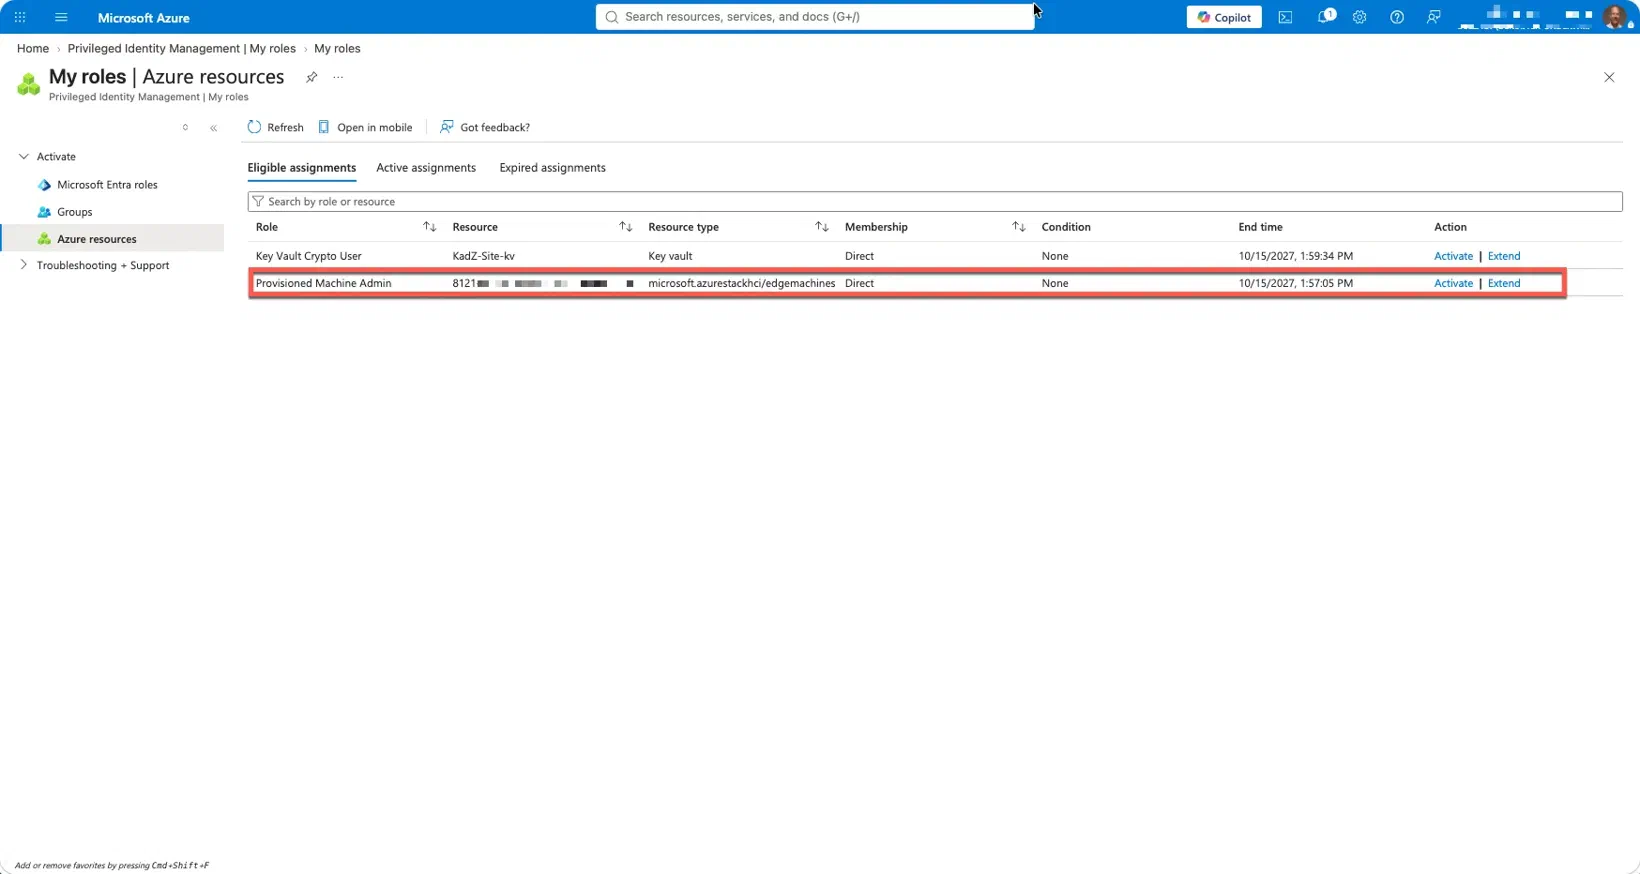
- Choose Provisioned Machine Admin and select your account.
- On the Settings tab, set the assignment type to Eligible.
- Repeat on the site’s key vault with the Key Vault Crypto User role, also Eligible.
Pay attention to the scope. The machine role belongs on the provisioned machine resource itself, not on the resource group and not on the vault. The vault only gets Key Vault Crypto User.
The documentation also adds an approver. Approval is a role setting in PIM, and PIM has no default approvers, so you choose them yourself. In my lab I’m the only operator and I left approval off. In production I would follow the docs and add approvers.
Install the provisionedmachine CLI extension#
The certificate is requested with an Azure CLI extension that isn’t in the public extension index yet. Download the provisionedmachine.whl and install it:
az extension add --source .\provisionedmachine-1.0.0b5-py3-none-any.whl
az extension list --output table
If an older version is installed, remove it first with az extension remove –name provisionedmachine.
Step 6: Activate and connect#
This is the part you repeat every time you need root on the machine. The setup above created the roles; this step activates them.
- Open Privileged Identity Management > My roles > Azure resources.
- Find Provisioned Machine Admin under the eligible assignments and select Activate.
- Set the duration (up to 8 hours), enter a justification and submit.
- Do the same for Key Vault Crypto User on the vault.
Both roles matter. Activating the machine role doesn’t activate the vault role, and without the vault role the certificate request fails with Access denied to Key Vault.
Next, open the provisioned machine in the portal and select Connect. The page refreshes itself, and once your roles are active it shows the certificate command and the SSH command, filled in with your vault name, resource ID and host name.
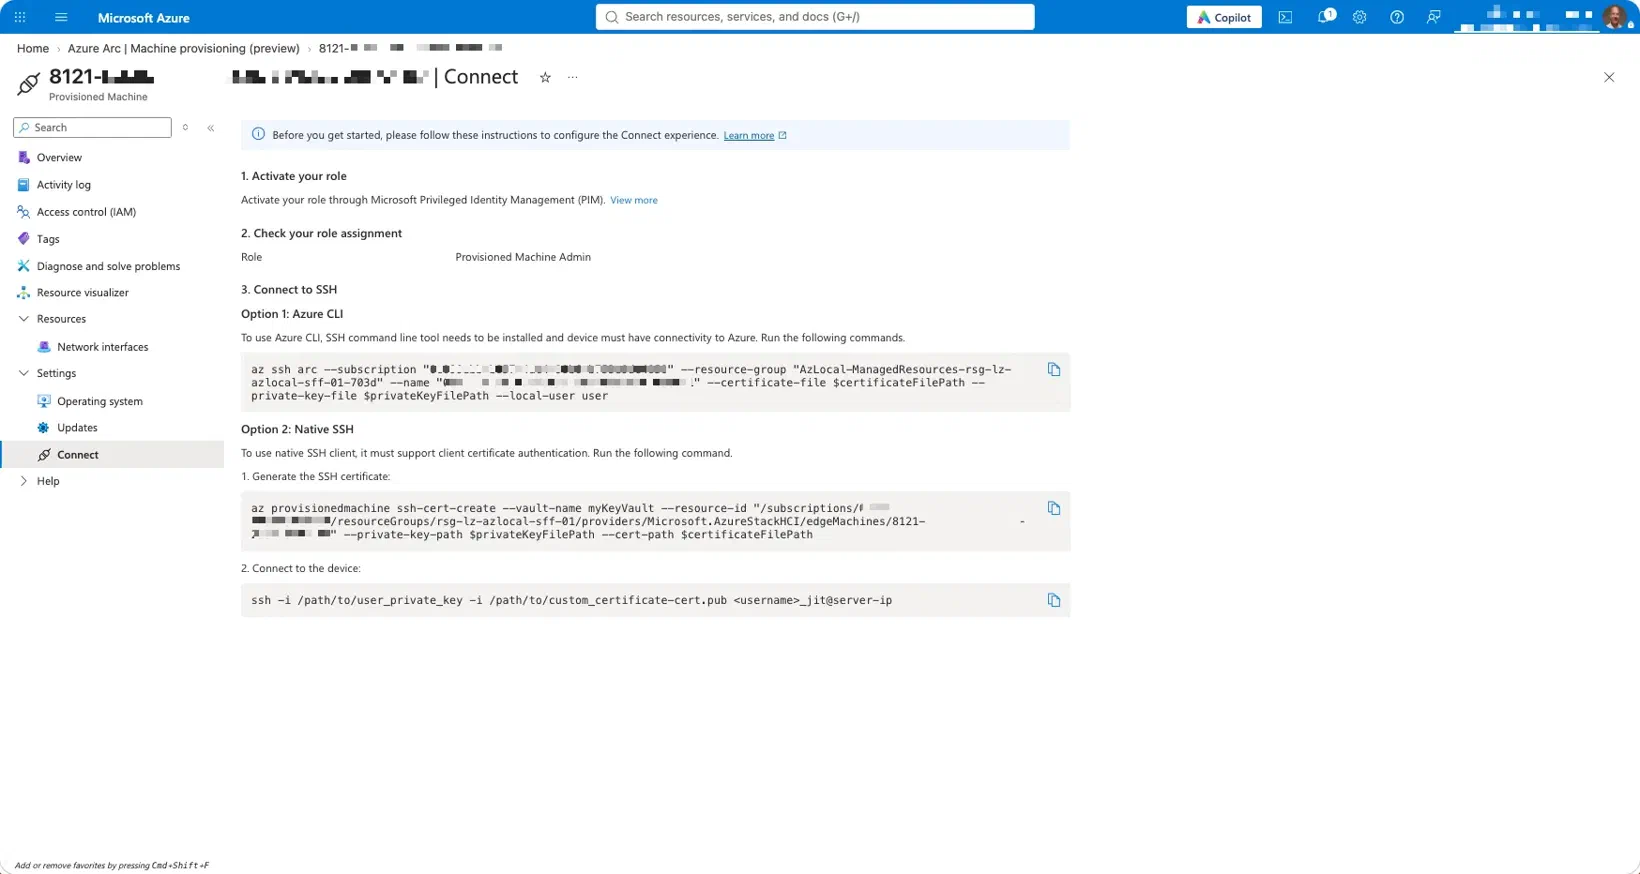
Sign in to the right tenant and request the certificate:
az login --tenant <tenant-id>
az account set --subscription <subscription-id>

az provisionedmachine ssh-cert-create --vault-name <vault-name> `
    --resource-id <provisioned-machine-resource-id>
I built the command by hand the first time and got this back:
No Provisioned Machine Reader, Contributor, or Admin role assignment
found for the current user on resource '/subscriptions/<subscription-id>/
resourceGroups/<resource-group>/providers/Microsoft.KeyVault/vaults/
<vault-name>'. Ensure PIM-based JIT access has been activated and the
role is scoped to the ProvisionedMachine resource.
The roles were fine. The resource in that message is the key vault, because that’s what I passed to –resource-id. That parameter wants the provisioned machine; the vault only goes into –vault-name. The command from the Connect page gets this right, or you look the ID up yourself:
$machineId = az resource list -g <resource-group> `
    --query "[?name=='<machine-name>'].id | [0]" -o tsv
$machineId

az provisionedmachine ssh-cert-create --vault-name <vault-name> `
    --resource-id $machineId
The output gives you a private key, a certificate and a ready-to-use SSH command. On the local network, connect directly with the machine’s IP address:
ssh -i <path>\id_rsa.pem `
    -o CertificateFile=<path>\id_rsa.pem-cert.pub `
    <username>_jit@<vm-ip>
Without a direct network path, az ssh arc takes the same key and certificate through the Arc connection instead. Either way you land in a session as jit, and with Provisioned Machine Admin active, sudo now works.
sudo -v && echo "sudo ok"When the activation expires, so does your access. Next time you start again at the activation.
Step 7: Install K3s#
With root available, K3s goes on in one command. I disable Traefik, as the Microsoft instructions do; an ingress controller can come later when a workload needs it.
curl -sfL https://get.k3s.io | \
    INSTALL_K3S_SKIP_SELINUX_RPM=true sh -s - --disable traefik
sudo k3s kubectl get nodes
Wait until the node shows Ready. K3s brings its own containerd, so it doesn’t use the Docker engine that’s included in the Azure Linux image.
Azure IoT Operations is the goal of this series, and it needs a few kernel limits raised on the node. The cluster preparation guide increases the inotify limits and the file descriptor limit. Doing it now saves a trip back to the machine later.
echo fs.inotify.max_user_instances=8192 | sudo tee -a /etc/sysctl.conf
echo fs.inotify.max_user_watches=524288 | sudo tee -a /etc/sysctl.conf
echo fs.file-max = 100000 | sudo tee -a /etc/sysctl.conf
sudo sysctl -p
sysctl -p prints the values it applied. With that, the machine runs a single-node K3s cluster that is ready to be connected to Azure.
I think#
Provisioning itself is the easy part of this post: upload a voucher, pick the right OS, wait an hour. The real work is access. Small form factor is built so that nobody holds standing root on an edge device, and that’s a good design. It just means PIM is a prerequisite rather than an extra, and you want to know that before you start.
So, can you now answer these? Which account does provisioning give you, and what can it do? Which role goes on which resource, and why does an eligible assignment alone not get you in? What does –resource-id expect?
In part 3 I copy the kubeconfig to my Windows PC, point it at the machine and run az connectedk8s connect with the OIDC issuer and workload identity that Azure IoT Operations needs. If you’re following along and hit something I didn’t, let me know.