Something else this time. Normally the blogs are about Mailbox migrations or Microsoft Azure or PowerShell with Graph API. This time we are having a look into Power Automate, Forms and Teams. Using PowerShell and Graph API to automate a task which can be addressed to a user instead of an admin needs to do so. Let the user take back control instead doing all the boring work as an admin.
Use case
A Company want to use Microsoft Teams instead of an old fashion fileserver. Redirecting the data to Microsoft Teams is no issue. For all the customers of the company is a channel created in a (all) customer teams. Every customer is divided in a channel. Private or standard with additional members.
Every channel had the same folder structure so documents can be found in the correct folder within the channel.
Now the company (say: GetToTheCloud) wants to provide the user with a Microsoft Form. The form hold some input which is needed to provision a new channel when a new customer is onboarded. The folder structure needs to be there and the members must be provided already. A side note to this is, that sometimes a channel needs to be private. This because not all the users from the department are allowed to see the data or content in the channel chat. The form must be available in a Microsoft Teams. The teams settings organisation wide is that creation of channels by users is not allowed. With this form users are allowed to create teams channels but it is monitored.
Needed
For this we are using:
- Microsoft Teams Forms
a form to get the input from the user - Power Automate
to start a flow when the respose of the form is received - Azure Function (serverless consumption plan)
this is needed to create with PowerShell to create the channel through Graph API and create the folder structure. i use an azure function because the teams connector in Power Automate is not able to create private channels
Let’s get started
First we are creating an App registration
Browse to https://portal.azure.com/#view/Microsoft_AAD_IAM/ActiveDirectoryMenuBlade/~/Overview to create a new app registration. It is just a basic app registration with a client secret and some API Permissions.
The API permissions you need to add are:
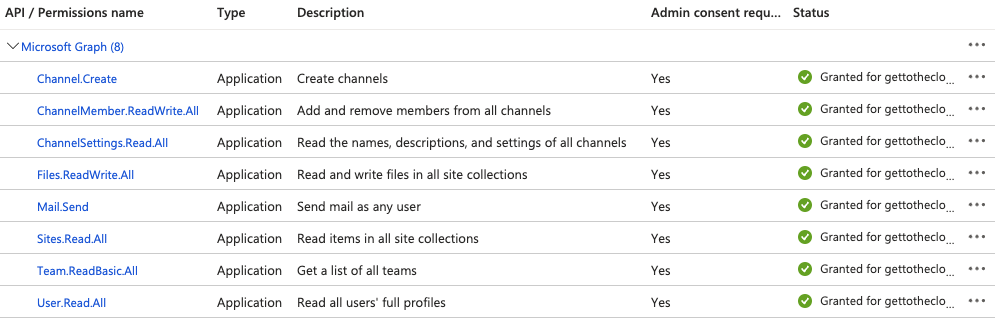
After adding the permissions, save the client secret en app id and tenant id.
Create Azure Function App
Browse to Function App – Microsoft Azure and click Create
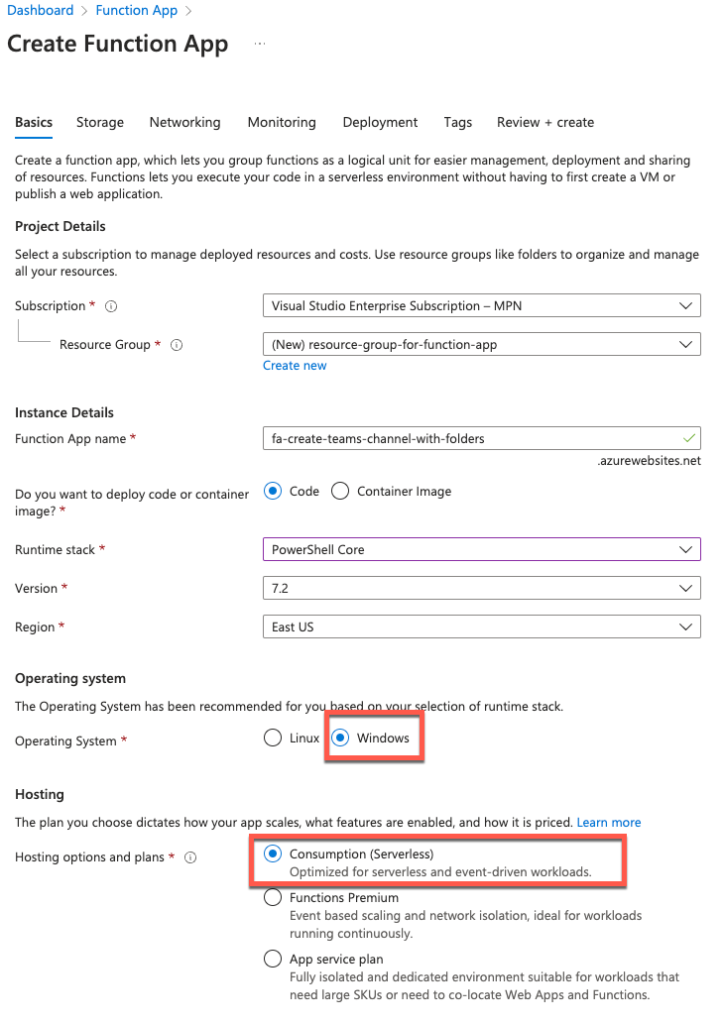
Choose a Resource group and a name for the function app. Select PowerShell Core and your region which is close to your country. If you choose for Consumption you will have a max of 60 minute duration that the function app can run before it timed out.
All the other tabs are just clicking next or if you like to change something to it. For this example I just click all next.
When the app is created, browse to it and click on configuration.
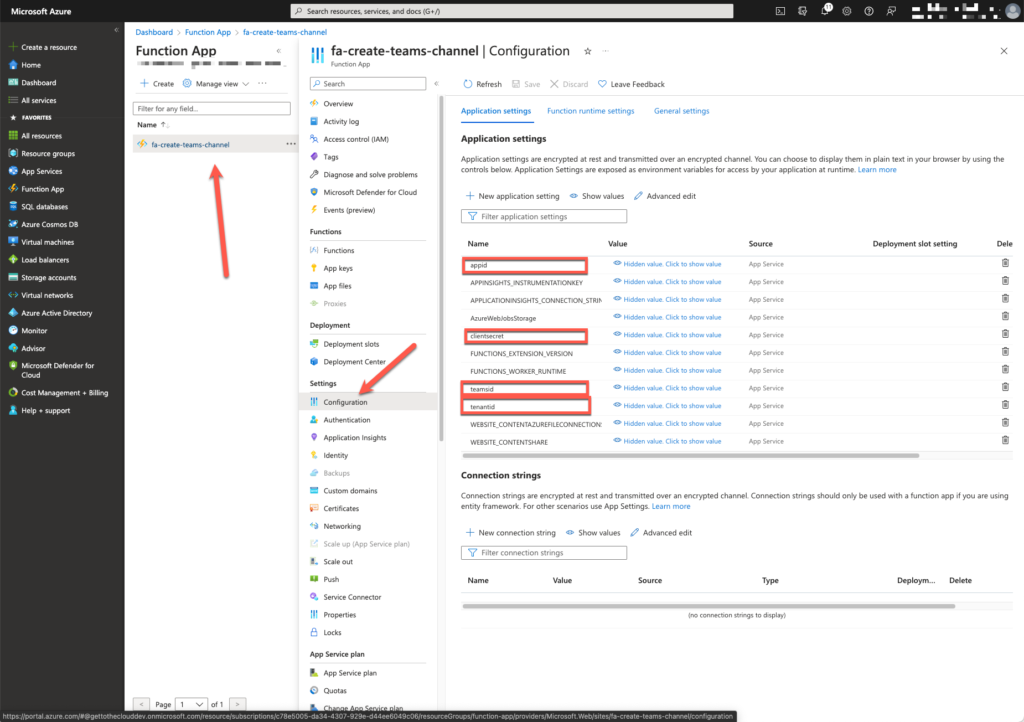
Add:
- Appid
AppId of App registration - ClientSecret
Client secret of App registration - TenantId
Add the tenantId - TeamsId
Add the teamsId of the teams where the channel needs to be created
Browse to App Files and select requirements.psd1
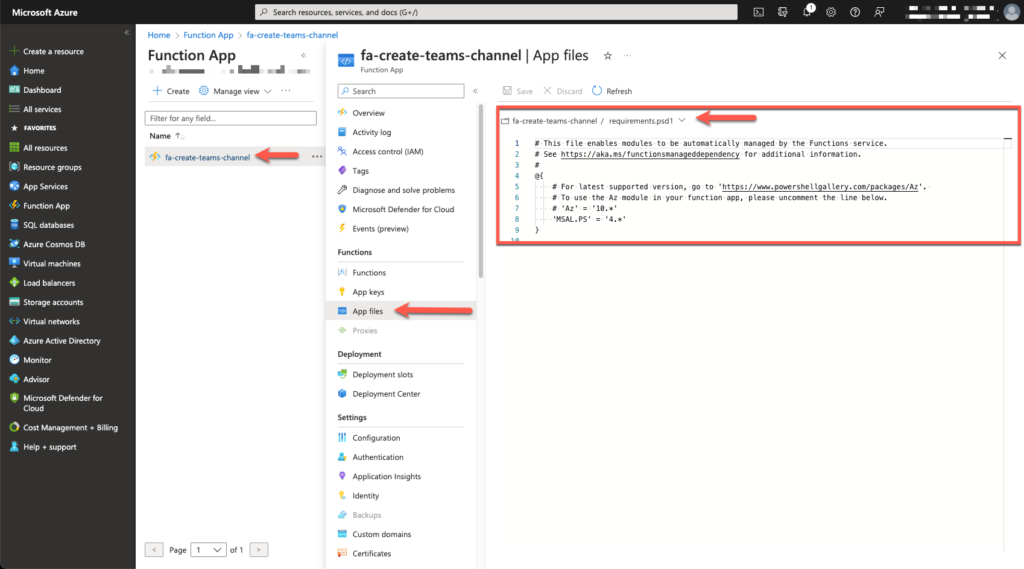
Add:
'MSAL.PS' = '4.*'Browse to Functions and add a Http-Trigger. When the trigger is created, select within the trigger Code + test. Select Run.ps1 and add the following script:
using namespace System.Net

# Input bindings are passed in via param block.
param($Request, $TriggerMetadata)

# Write to the Azure Functions log stream.
Write-Host "PowerShell HTTP trigger function processed a request."

# Interact with query parameters or the body of the request.
$name = $Request.Body.Name
$description = $Request.Body.description
$owner = $request.Body.Owner
$private = $request.Body.private
$defaultFolders = $request.Body.defaultFolders

# function to send e-mail
function Send-MailToinform {
    param(
        [Parameter(Mandatory)]
        [string]$to,
        [Parameter(Mandatory)]
        [string]$from,
        [Parameter(Mandatory)]
        [string]$TeamsName,
        # [Parameter(Mandatory)]
        # [array]$content,
        [Parameter(Mandatory)]
        [bool]$created
    )

    $emailSender = $from
    $emailSubject = "Creation of Teams channel: $TeamsName"
    #endregion 1


    #region 2: Run

    $Message = "<html><head>"
    $message += "<style>
    table, th, td {
      border: 1px solid black;
      border-collapse: collapse;
    }
    th, td {
      padding: 5px;
    }
    th {
      text-align: left;
    }
    </style><body>"
    $Message += "Hi,<br>"
    $message += "<br>"
    if (!($Created)) {
        $message += "Unable to create a channel with the name $TeamsName. This is because it already exist.<br>"
        $message += "Please submit the form again with a different unique name.<br>"
    }
    else {
        $message += "Channel with the name $teamsname is created<br>"
    }
    $message += "<br>"
    $message += "Kind regards,<br>"
    $Message += "<br>"
    $message += "Your Teams Channel provision tool!"
    $MessageParams = @{
        "URI"         = "https://graph.microsoft.com/v1.0/users/$emailSender/sendMail"
        "Headers"     = $Header
        "Method"      = "POST"
        "ContentType" = 'application/json'
        "Body"        = (@{
                "message" = @{
                    "subject"      = $emailsubject
                    "body"         = @{
                        "contentType" = 'HTML'
                        "content"     = $Message
                    }
                    "toRecipients" = @(
                        @{
                            "emailAddress" = @{"address" = $to }
                        } )
                    "importance"   = "High"
                }
            }) | ConvertTo-JSON -Depth 6
    }   # Send the message
    Invoke-RestMethod @Messageparams

}

# setting variables for GraphAPI call
$appid = $ENV:appId
$clientsecret = $ENV:clientSecret | ConvertTo-SecureString -AsPlainText -Force
$tenantID = $ENV:TenantID
$teamsid = $Env:Teamsid

# getting tokens
do {
    try {
        $Token = (Get-MSALToken -Clientid $Appid -ClientSecret $ClientSecret -TenantId $TenantId -ForceRefresh)
        $mustRetry = 0
    }
    catch {
        $mustRetry = 1
        Start-Sleep -seconds 2
    }

} while (
    $mustRetry -eq 1
)

## private channel parameters
if ($Private) {
    $membershipType = "private"
}
else {
    $membershipType = "standard"
}

# setting url for owner
$userDatabind = "https://graph.microsoft.com/v1.0/users('$($owner)')"

# setting parameters to create teams channel
$params = @{
    "@odata.type"  = "#Microsoft.Graph.channel"
    membershipType = $membershipType
    displayName    = $name
    description    = $description
    members        = @(
        @{
            "@odata.type"     = "#microsoft.graph.aadUserConversationMember"
            "user@odata.bind" = $userDatabind
            roles             = @(
                "owner"
            )
        }
    )
}

# convert parameters
$body = $params | ConvertTo-Json -Depth 5
$apiUri = "https://graph.microsoft.com/v1.0/Teams/$teamsId/channels"
$header = @{
    'Authorization' = "BEARER $($Token.accesstoken)"
    'Content-type'  = "application/json"
}

# create channel with parameters
try {
    $createChannel = Invoke-Restmethod -Method POST -Uri $apiUri -headers $header -Body $body
}
catch {
    $webError = $_
    $webError = ($weberror | convertFrom-json).error.innererror.code
}

# if creation of folders is True, create default folders
if ($defaultFolders -eq $true) {
    do {
        try {
           # getting folder location
            $folderlocation = (Invoke-Restmethod -method Get -headers @{Authorization = "Bearer $($Token.accesstoken)" } -Uri https://graph.microsoft.com/v1.0/teams/$teamsid/channels/$($CreateChannel.id)/filesFolder).weburl.split(".com")[1] + "/Children"
            $mustRetry = 0
        }
        catch {
            $weberror = $_
            $mustRetry = 1
            Start-Sleep -seconds 2
        }

    } while (
        $mustRetry -eq 1
    )

    $drive = Invoke-Restmethod -method Get -headers @{Authorization = "Bearer $($Token.accesstoken)" } -Uri https://graph.microsoft.com/v1.0/teams/$teamsid/channels/$($CreateChannel.id)/filesFolder
    $driveId = $drive.id
    $driveitemId = $drive.parentReference.DriveId

    # determine default folders to create
    $foldersToCreate = "Communication", "Administration $((Get-Date).year)", "Another folder"
    ForEach ($FolderToCreate in $foldersToCreate) {
        ## create folderstructure
        $params = @{
            name                                = $FolderToCreate
            folder                              = @{
            }
            "@microsoft.graph.conflictBehavior" = "rename"
        }

        $params = $params | ConvertTo-Json
        Invoke-Restmethod -Method POST -Uri "https://graph.microsoft.com/v1.0/drives/$driveitemid/items/$DriveId/children" -headers $header -body $params
    }
}

# check if error is that channel already exist
if ($weberror -eq "NameAlreadyExists") {
    # send email to inform
    Send-MailToinform -to $owner -from $owner -created $false -TeamsName $name
}
else {
    # send email to inform
    Send-MailToinform -to $owner -from $owner -created $true -TeamsName $name
}

#

# Associate values to output bindings by calling 'Push-OutputBinding'.
Push-OutputBinding -Name Response -Value ([HttpResponseContext]@{
        StatusCode = [HttpStatusCode]::OK
        Body       = $body
    })
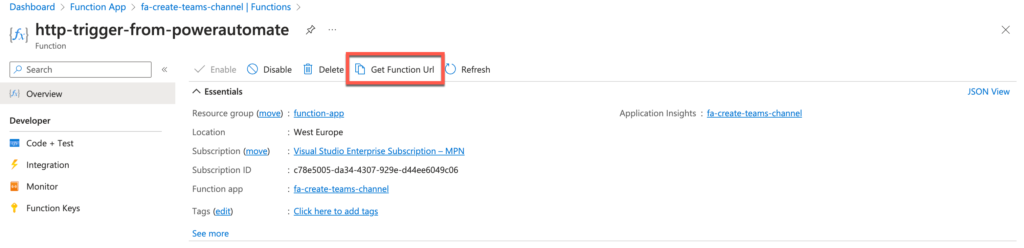
Browse to the Azure Function Trigger and copy the Function Url. Write it down to use later.
Building the form in teams
Add Teams Forms to the teams where the channels needs to be created. When added and installed create a new form from blank.
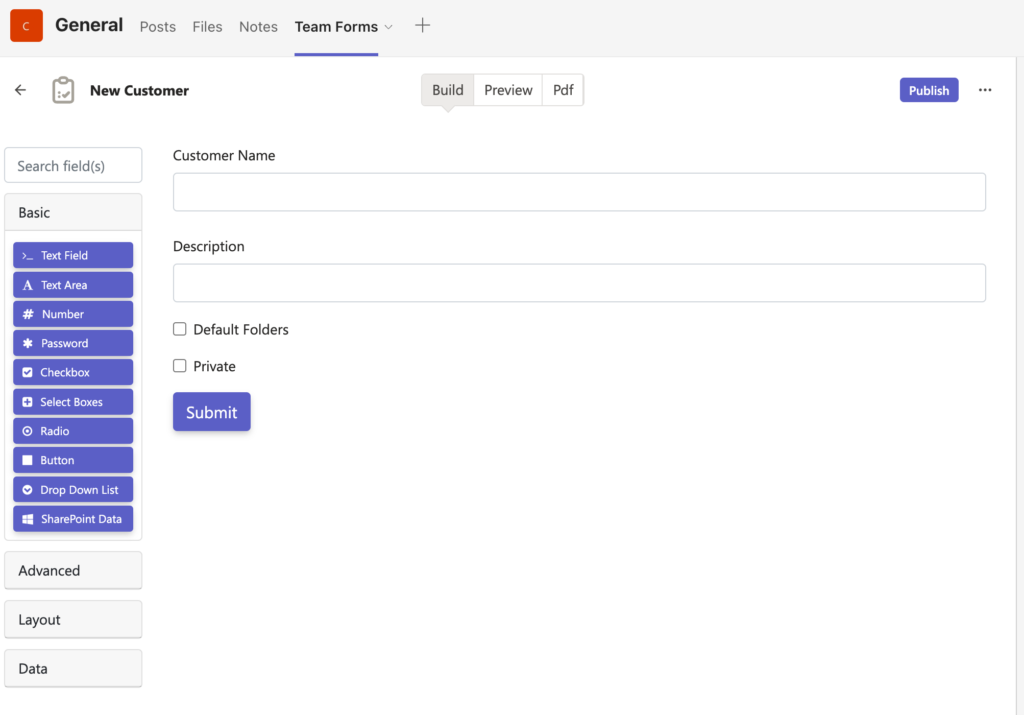
As in the example, the form below is needed to create the channels.
Power Automate Flow
After creating the form and the azure function, it is time to connect them. In Power Automate we use a premium function HTTP for this. It is in this case 90-day free trial and after $0,60 per run. Depending how often this is needed to run, you can decide which plan fits the best to your needs.
Browse to Power Automate and go to My Flows
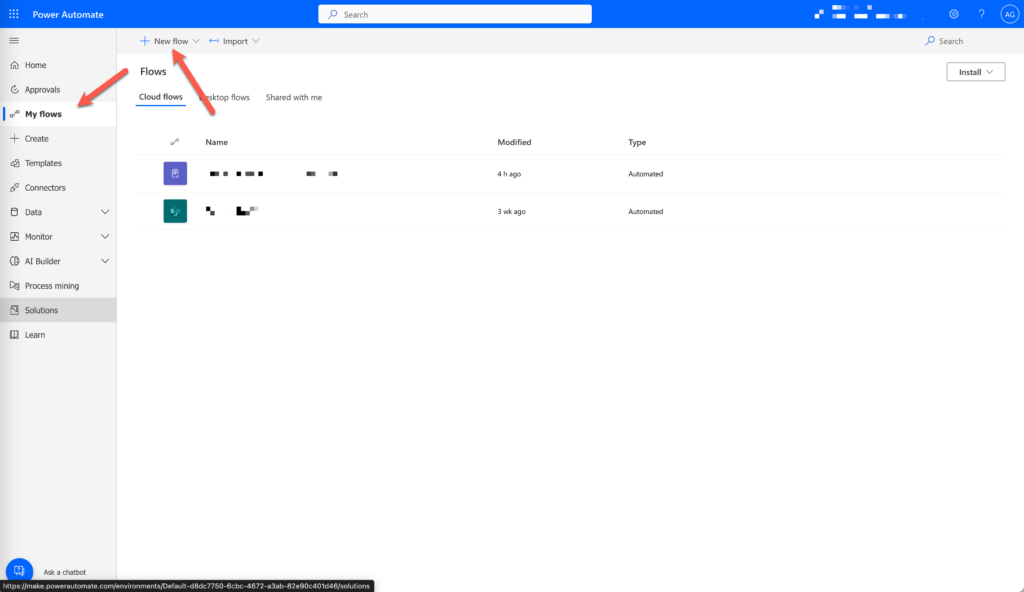
Create a new flow, Automated cloud flow

Provide a name en search for Forms. Select When a new form response is submitted and click Create
Create the flow by adding the form as the trigger and the next step is a HTTP
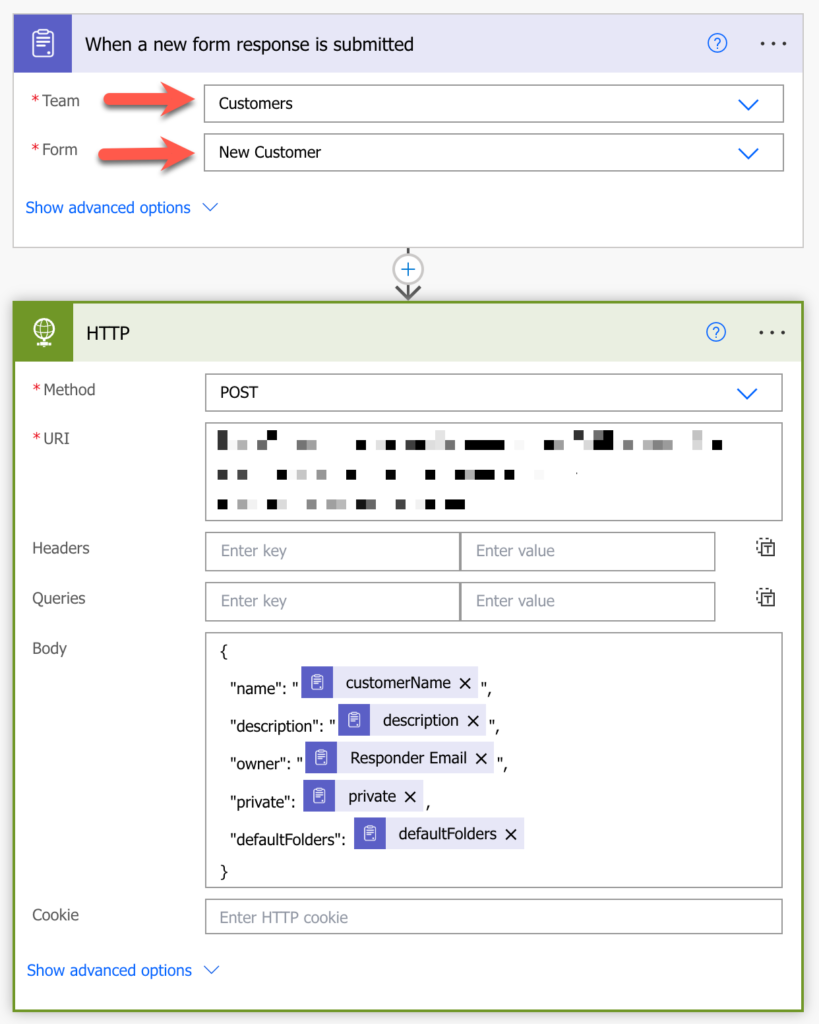
In the Body of the HTTP place the same as above with your fields. Make sure the Name, Description and owner are between ” “.
Save the flow.
Testing
In Microsoft Teams go to your form and fill the form

As you can see, only the General channel is created by default. With the form we are now creating a new channel called: Test channel for website and set the Private and Default Folders checked.
Click SUBMIT
After creating you will receive an email like:
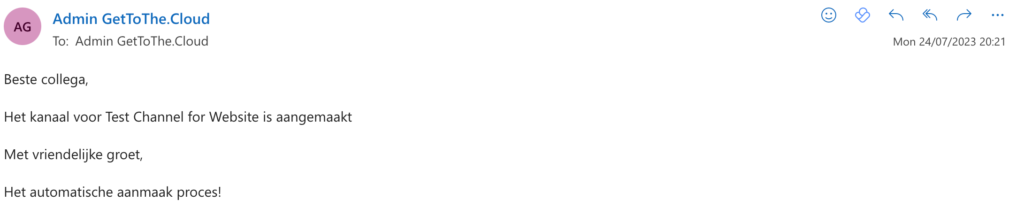
and within Microsoft Teams you will see:

A new private channel is created with in the Files tab the default folders as defined in the Azure Function.
#happyprovisioning