Azure Local | HomeLab – Migrate from Hyper-V
Migrating from a traditional Hyper‑V environment to Azure Local represents a significant step forward in modernizing your infrastructure, but it can also feel like a complex undertaking. Before any workloads can be migrated, your Azure Local environment must be deployed, configured, and aligned with best‑practice architecture. This includes setting up the Azure Local cluster, creating and assigning logical networks, and ensuring that Azure Arc integration is functioning reliably so the platform can be managed seamlessly from the Azure Portal.
These foundational preparations are essential to guarantee a smooth transition from on‑premises virtualization to a cloud‑connected, hybrid platform. In this blog, I will walk you through the key steps required to successfully migrate a server from Hyper‑V to Azure Local, highlight important considerations, and demonstrate how to avoid common pitfalls. By the end, you will have a clear path toward moving your workloads with confidence and precision.
Keep in mind: This is still in preview !!
Current environment
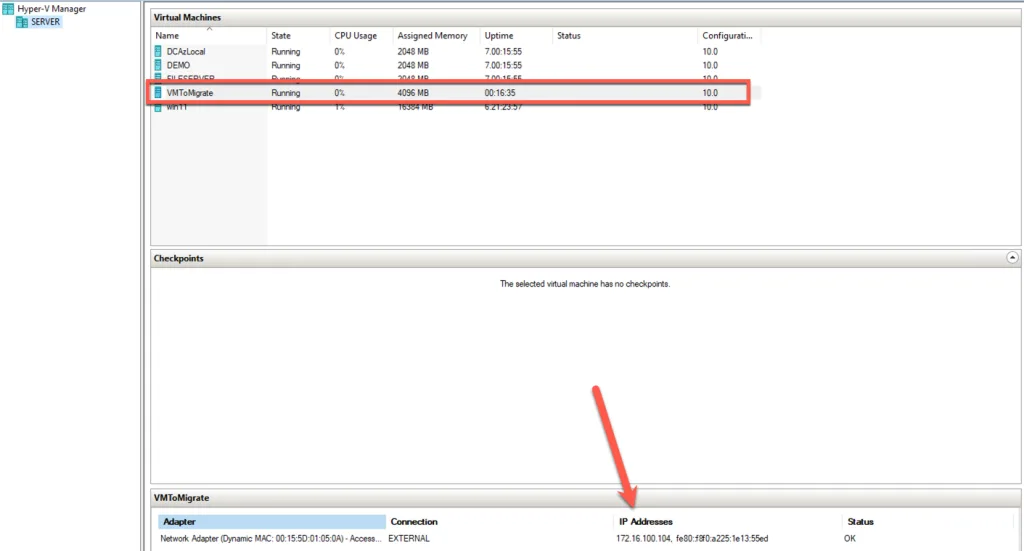
To give you some context around my setup, my home lab currently consists of two Hyper‑V NUCs. One of them is dedicated entirely to Azure Local, serving as the foundation for exploring hybrid cloud capabilities in a controlled environment. The second NUC hosts a collection of additional virtual machines that support various workloads and testing scenarios. Although both devices reside in different subnets, full connectivity is ensured between them, allowing seamless communication across the environment.
On the Hyper‑V NUC that runs the auxiliary workloads, I’ve created a virtual machine named VMToMigrate. This VM has been purposely placed in the same subnet as the Azure Local instance, ensuring network compatibility and simplifying the migration process. With this topology in place, we have a realistic and practical setup that mirrors what many IT professionals face when transitioning from traditional Hyper‑V environments to Azure Local.
As a brief side note, it’s important to highlight that in a real‑world production environment, you would never place your Hyper‑V hosts in the same subnet as your Azure Local nodes. Proper network segmentation is essential for performance, security, and clean separation of roles within the infrastructure. However, for the purposes of testing, learning, and demonstration within a home lab, strict adherence to enterprise‑grade network design isn’t required. The goal here is to simplify the setup enough to focus on the migration process itself, without introducing unnecessary network complexity. As long as connectivity is in place, the demo scenario functions perfectly for showcasing the migration experience.
Azure Migrate
Before you can begin assessing or migrating workloads to Azure Local or Azure, you first need to create an Azure Migrate project. This project will act as the central hub for discovery, assessment, and migration activities.
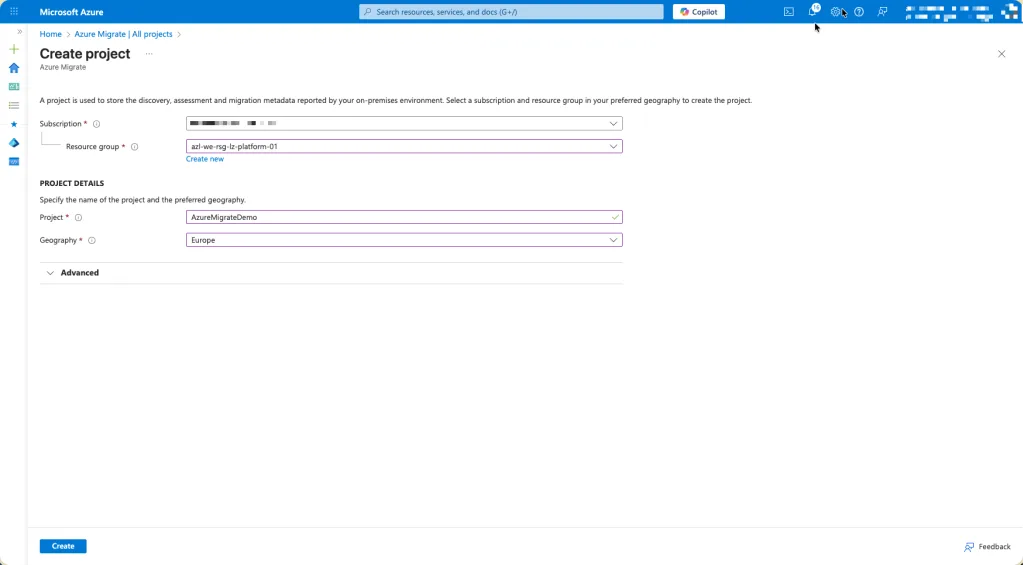
Create a project for Azure Migrate
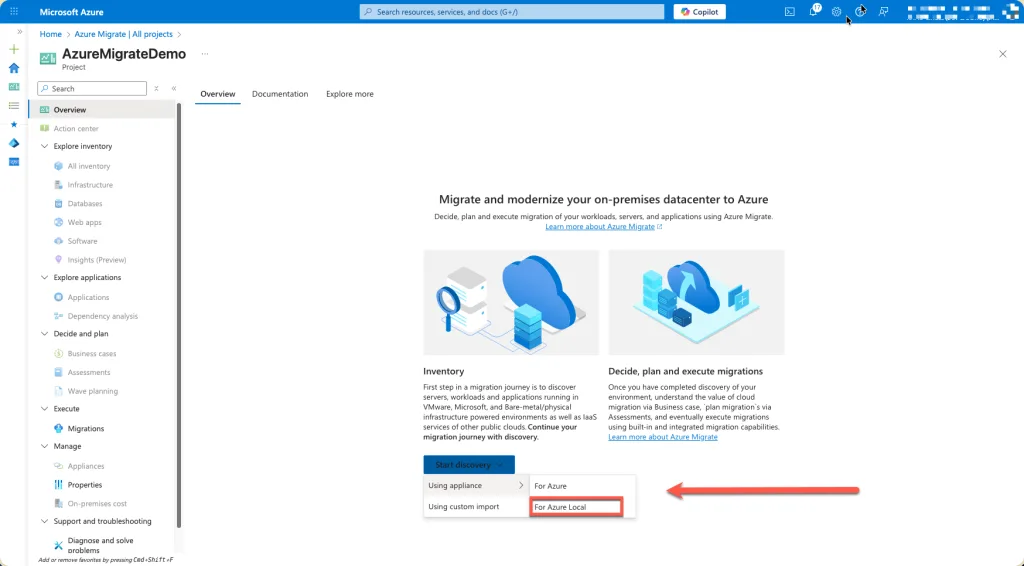
When creating the Azure Migrate project, it’s important to choose the correct discovery appliance. Because we are migrating a virtual machine into Azure Local, the discovery and replication process must be handled by the Azure Local appliance, not the standard Hyper‑V or VMware migration appliances.
Inside the Azure Migrate wizard, after selecting to discover servers, choose the option for an Azure Local appliance. This appliance is specifically designed to integrate with Azure Local clusters and provides the necessary components for discovery, performance monitoring, and migration orchestration. It ensures that metadata, replication policies, and connectivity align with the capabilities and constraints of Azure Local.

Download the appliance, deploy it in your environment, and register it using the generated key. From that point forward, the Azure Local appliance will begin discovering the virtual machines in your Hyper‑V environment, including the VM we intend to migrate. This targeted approach enables a seamless migration workflow from traditional Hyper‑V infrastructure toward a fully operational Azure Local instance.
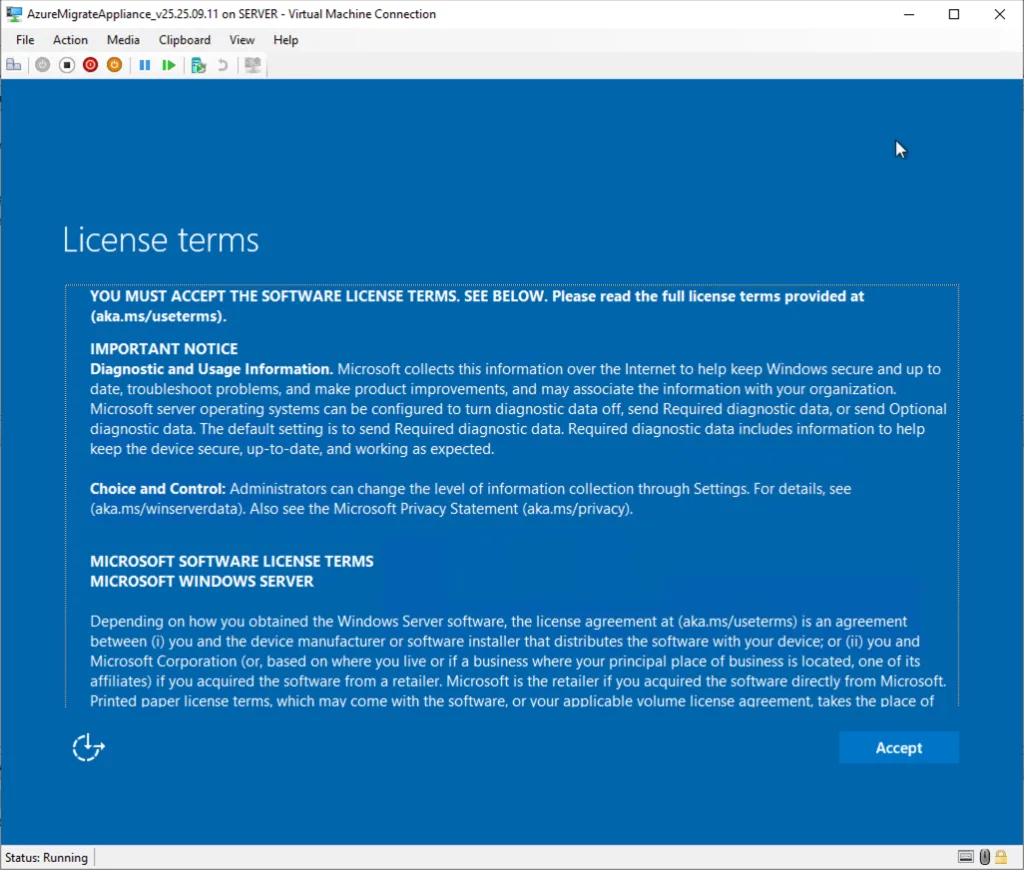
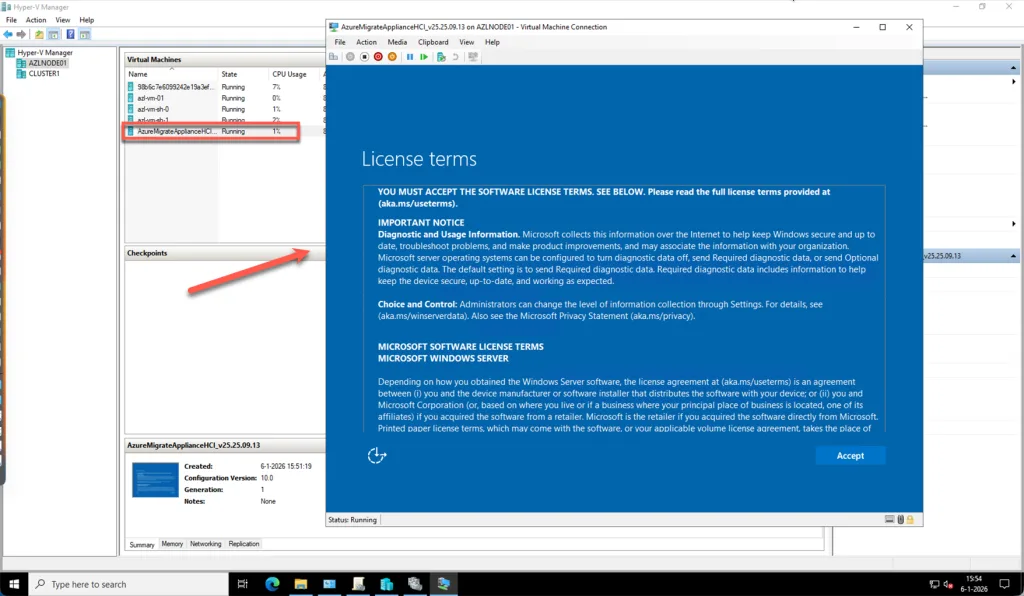
After selecting the Azure Local appliance and starting the deployment process, the setup wizard will guide you through the initial configuration. One of the first steps is to review and accept the Microsoft license terms associated with the appliance. This is a required step before the deployment can proceed, as it ensures that the appliance operates within the supported and approved usage conditions for Azure Local migrations.
Once you have accepted the license terms, the wizard will prompt you to set a secure password for the appliance. This password is used to access the local administrative interface and is essential for completing the initial setup, registering the appliance with Azure, and managing the ongoing discovery and replication processes. Make sure to choose a strong password that meets your organization’s security standards, as this appliance will play a central role in your migration workflow.
With the terms accepted and the password configured, the appliance is ready to finalize its installation and prepare for registration with your Azure Migrate project.
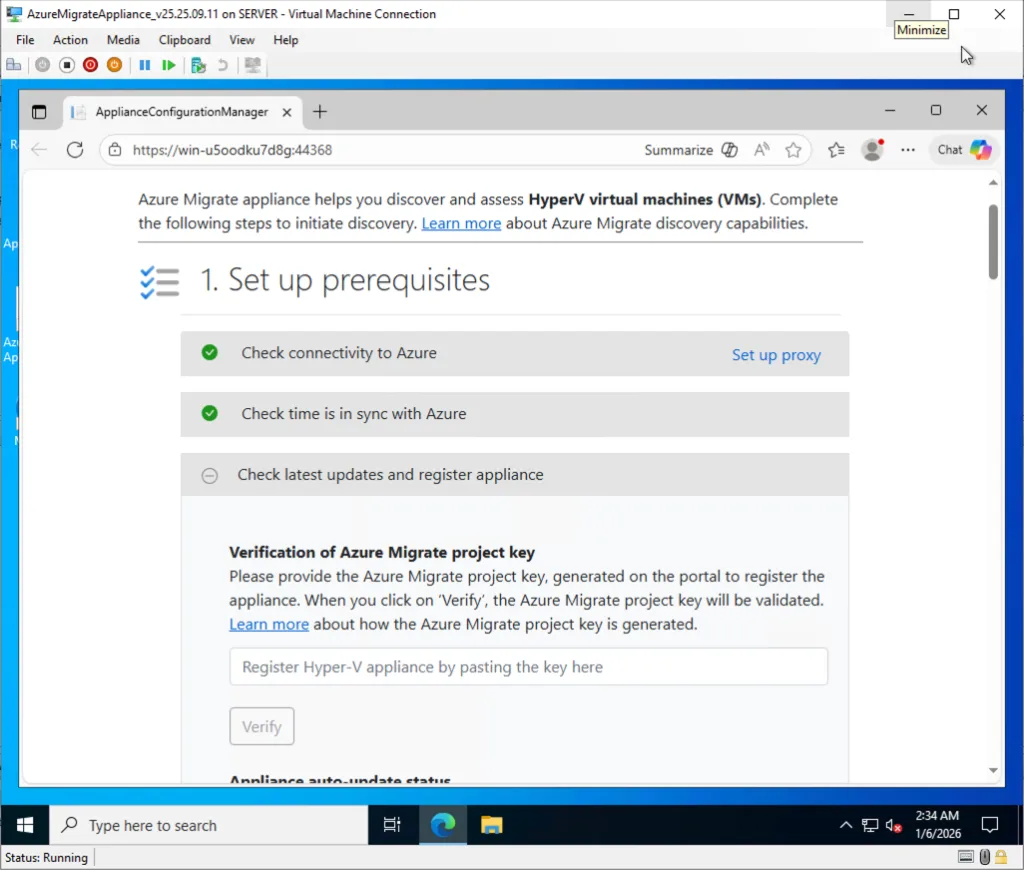
After the appliance has finished deploying, log in using the password you configured during setup. Once authenticated, the Azure Local appliance will initialize its services and eventually display the onboarding screen required to connect it to your Azure Migrate project.
At this stage, return to the Azure Portal and navigate to your Azure Migrate project. Under the Discover section, select the option to connect an Azure Local appliance. Here, click Generate Key to create a unique registration key for this appliance. Azure will provide a long, secure string that establishes the trust relationship between your environment and the migration service.
Copy this key and return to the appliance interface. Paste the key into the appropriate field and run the verification step. The appliance will validate the key with Azure to confirm that it is authorized to send discovery data and participate in future migrations. Once verified, the appliance completes its onboarding and is ready to begin discovering virtual machines within your Hyper‑V environment.
Once the appliance is registered and communication with Azure has been verified, the next step is to provide the credentials and connection details needed for discovery. In the appliance interface, enter the appropriate administrative credentials, either for your Hyper‑V host or directly for the Azure Local cluster, depending on where the virtual machine resides. These credentials allow the appliance to authenticate, enumerate the available virtual machines, and begin collecting metadata required for migration.
You will also need to specify the IP address or hostname of the Hyper‑V server or cluster. The appliance uses this endpoint to initiate the discovery process and establish a secure connection for ongoing performance data gathering. Ensuring that DNS resolution and network connectivity are functioning correctly at this stage is crucial for a smooth onboarding experience.
If you encounter any issues during this step, such as authentication failures, connectivity problems, or missing permissions, Microsoft provides a helpful diagnostic script. You can download and run the script directly on your Hyper‑V host using the following link: https://aka.ms/migrate/hyperv/script
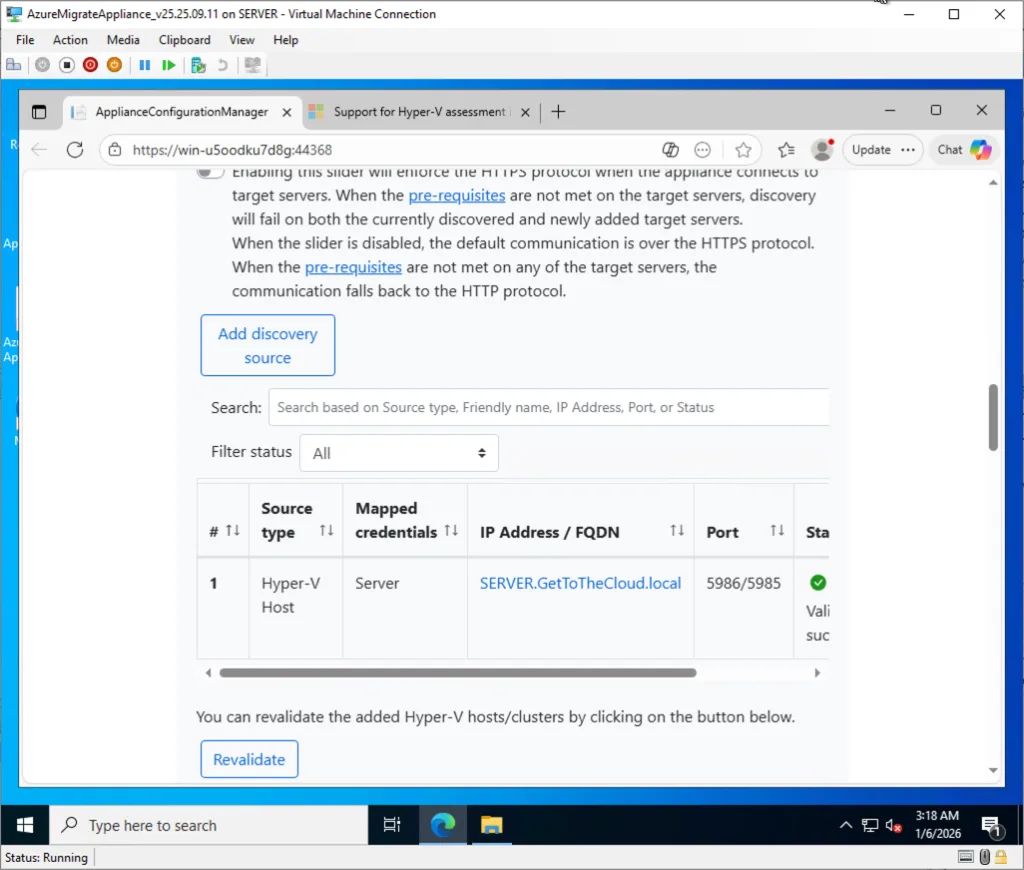
If everything is validated, you can click on Start Discovery.
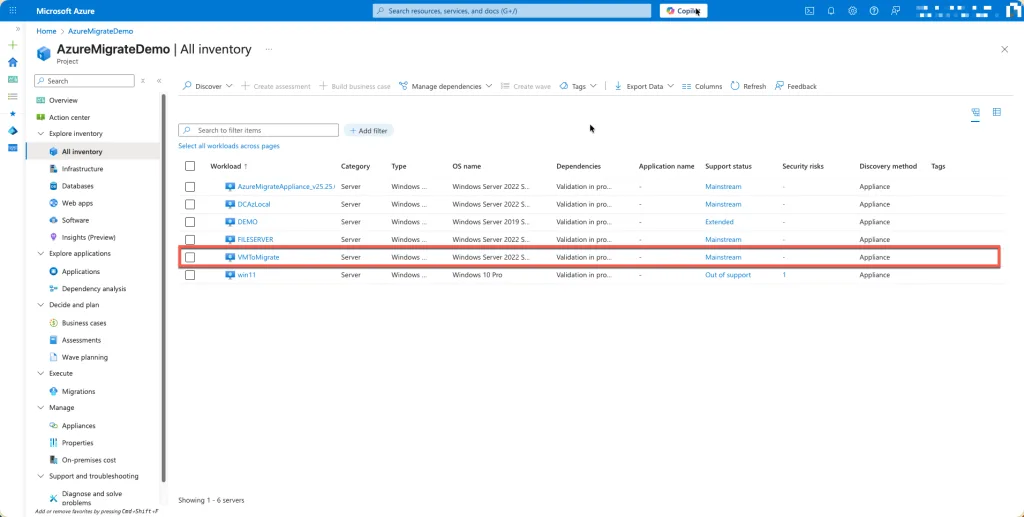
After the discovery process completes, you will see all virtual machines from your Hyper‑V environment appear in the Azure Migrate project within the Azure Portal. The appliance continuously sends metadata and performance information to Azure, allowing you to view an accurate inventory of every detected server. Each machine will display details such as its name, operating system, CPU and memory configuration, and readiness state, giving you full visibility into what is available for migration.
This confirmation in the Azure Portal marks an important milestone: it verifies that the appliance is working correctly, that credentials and connectivity are functioning, and that Azure Migrate now has a complete overview of your Hyper‑V environment.
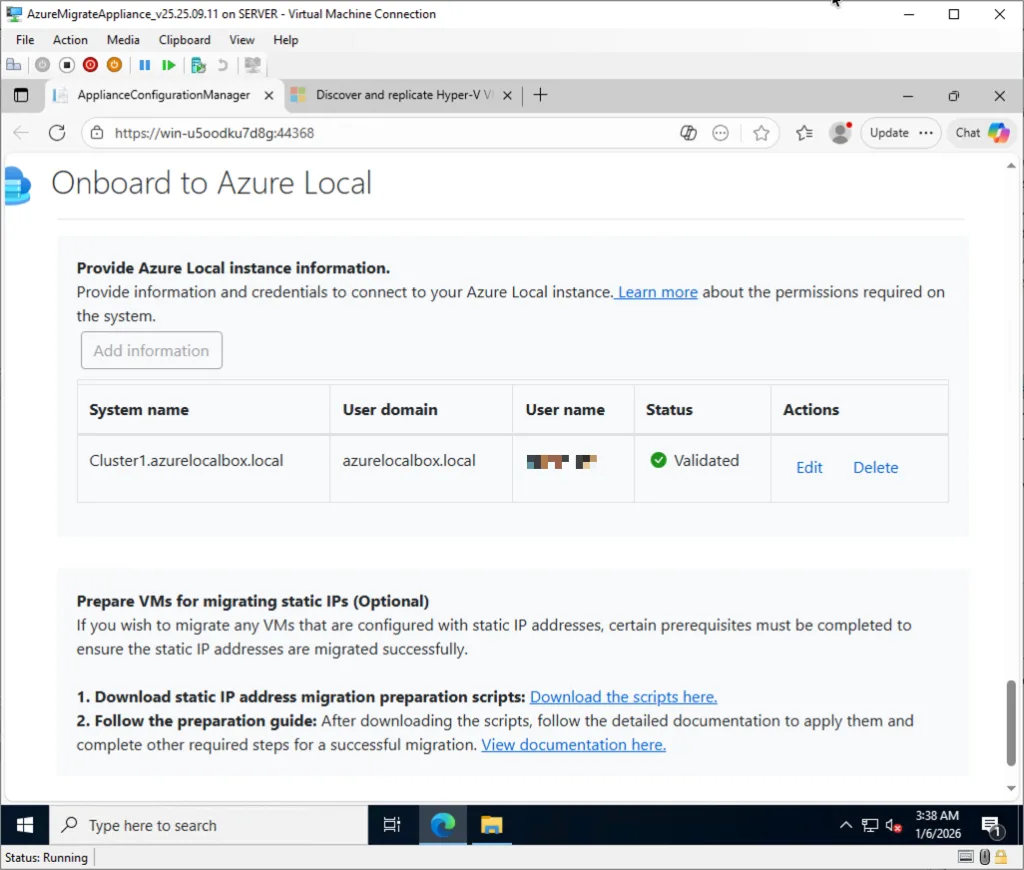
Add your credentials of your Azure Local cluster and validate. This step confirms that the appliance can successfully authenticate to the Azure Local cluster, communicate with it over the required ports, and retrieve the necessary metadata. A successful validation ensures that Azure Migrate can orchestrate replication and migration activities without interruption. If anything is misconfigured, such as permissions, networking, or DNS resolution, the validation process will highlight it, giving you the opportunity to correct the issue before moving forward.
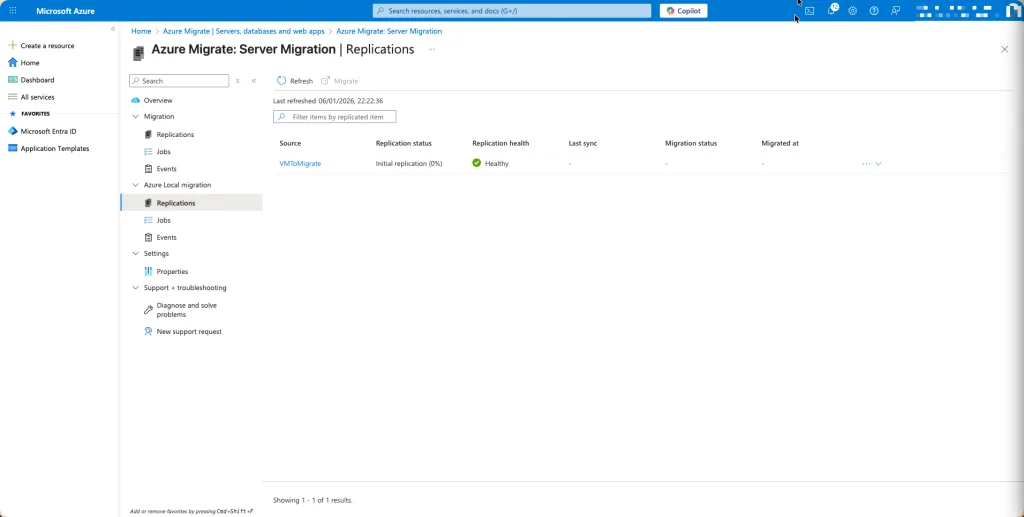
Replication
With the Azure Local appliance configured and validated, the next step takes place inside the Azure Portal. Navigate back to your Azure Migrate project, and in the project menu you will find the Migrations section. This is where all migration activities are initiated and monitored. By selecting Migrations, you gain access to the migration dashboard, which displays the machines discovered by the appliance, their readiness state, and the actions available for each one.
From here, you can select the virtual machine you want to migrate, in this case, VMToMigrate, and begin preparing it for replication. The portal provides a clear overview of what is required, highlights any missing prerequisites, and offers options to configure replication settings tailored to Azure Local. This central location is the operational hub for your migration workflow, guiding you through each stage until the workload is fully running on your Azure Local cluster.
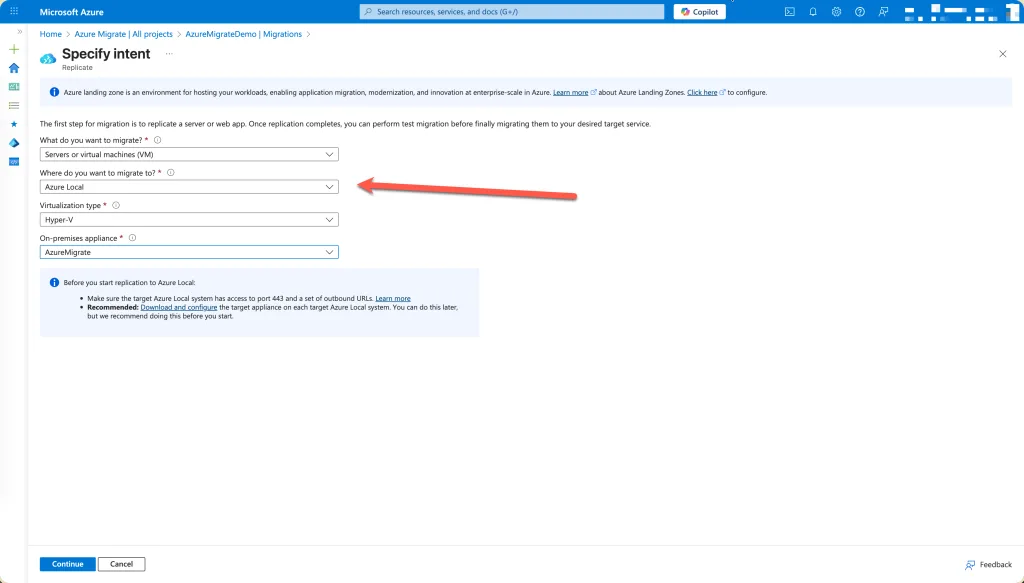
Before committing to a full migration, it’s best practice to start with replication. In the Azure Portal, within your Azure Migrate project, select Replication as the first step. By initiating replication before executing a cut‑over, you can validate that the end‑to‑end migration pipeline is functioning correctly, covering connectivity, permissions, performance data collection, and the appliance’s ability to replicate disks to your Azure Local cluster.
Choosing replication first provides an opportunity to verify that the virtual machine synchronizes successfully without impacting production workloads. It also helps identify any configuration issues early in the process, such as missing prerequisites, network constraints, or unsupported settings. Once replication completes and the VM enters a healthy, synchronized state, you can proceed confidently to the actual migration knowing the environment is prepared and the pipeline is working as expected.
The next step in preparing for migration is to download the Azure Local appliance directly from the Azure Portal. This appliance is required to establish the secure connection between your on‑premises Hyper‑V environment and Azure Local. Within your Azure Migrate project, navigate to the Servers section and select Discover. From there, choose the option specifically labeled for Azure Local, ensuring you download the correct appliance image designed for hybrid migrations into Azure Local infrastructure.
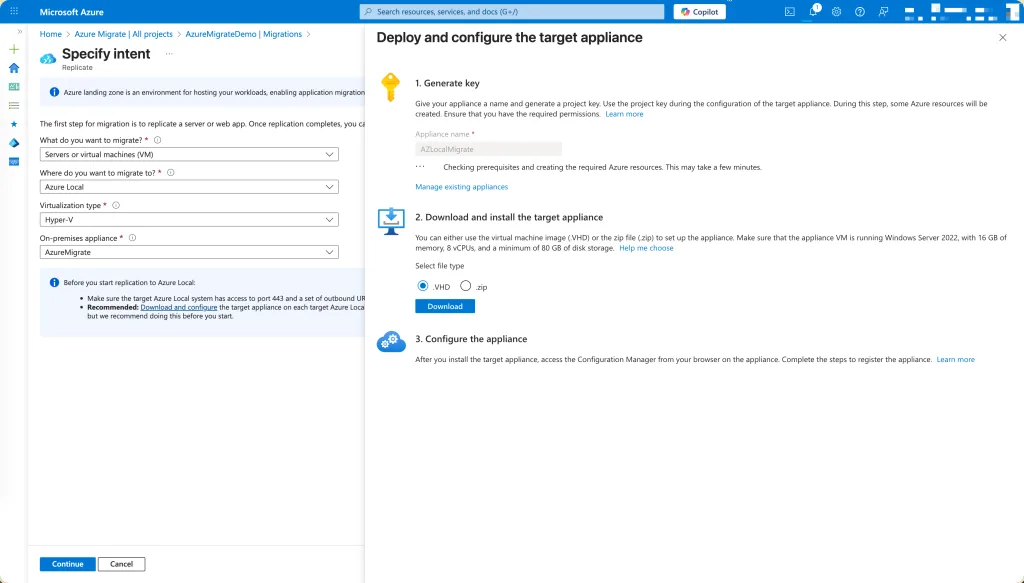
Once you select the Azure Local appliance, the portal will prompt you to generate a registration key. This key uniquely identifies your Migrate project and enables the appliance to authenticate against Azure. Click Generate Key, and Azure will create a secure, one‑time registration string. Copy this key and keep it available—you will need it shortly when configuring the appliance after deployment.
With the appliance downloaded and the registration key in hand, you now have everything required to deploy the appliance in your Hyper‑V environment and begin the onboarding process. This step ensures that the migration workflow is securely linked to your Azure Local project and ready to begin discovery and replication activities.
For Azure Local migrations, each node in your cluster requires its own Target Appliance. This ensures that replication traffic, storage placement, and migration orchestration are handled reliably across the entire cluster. To deploy the appliance, use either Hyper‑V Manager or the Failover Cluster Manager tools—whichever aligns best with your environment and workflow.
The installation process on each node follows the same steps you performed earlier when deploying the initial appliance. Import the virtual machine image, configure the virtual hardware, and power on the appliance. Once it boots, you will again be prompted to accept the license terms and provide a secure administrative password. After logging in, apply the registration key generated from the Azure Portal to connect the target appliance to your Azure Migrate project.
Repeat this process on every node within the Azure Local cluster. Doing so ensures that migrations can be orchestrated seamlessly across the cluster and that the environment is prepared for high‑availability scenarios during both replication and cut‑over. Once all appliances are deployed and registered, your Azure Local infrastructure is fully equipped to receive workloads from your Hyper‑V hosts.
Continue with the replication configuration.
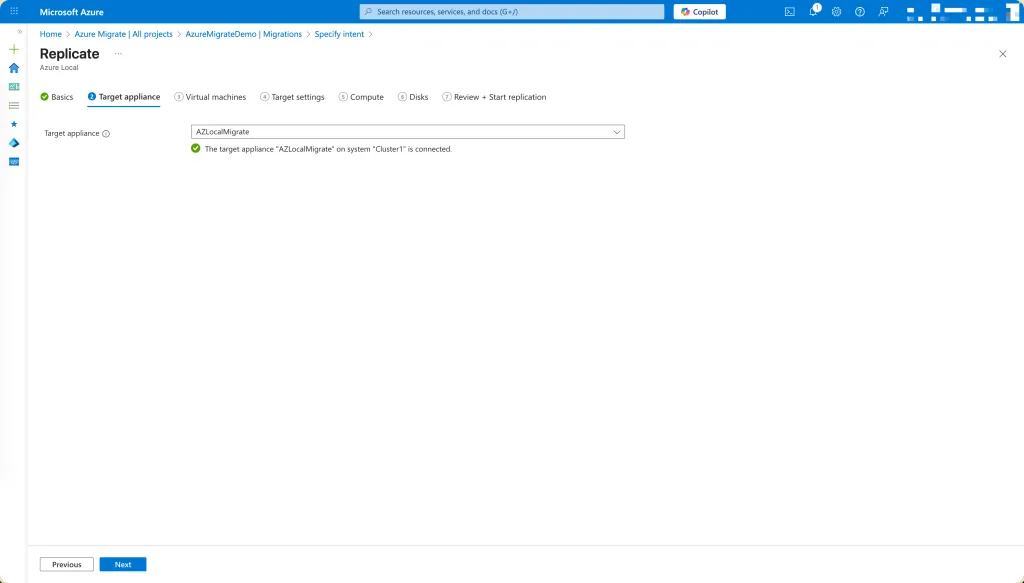
The next step is to select the correct target appliance that will handle the replication for your workload. In my setup, only a single appliance is required, so I simply select that one from the list. Choosing the proper target appliance ensures that the replication traffic is routed correctly and that the virtual machine is prepared for migration into Azure Local. Once selected, the portal will guide you through the remaining configuration steps and validate that the appliance is ready to receive data from the Hyper‑V host.
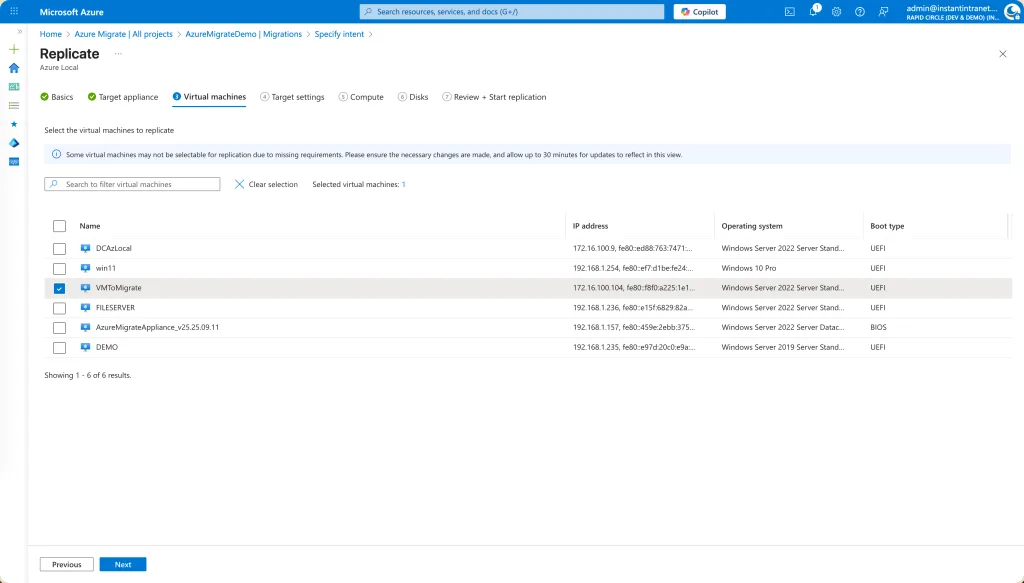
With the target appliance selected and validated, the next step is to choose the specific virtual machine you want to migrate. Azure Migrate will display a full list of all discovered machines from your Hyper‑V environment, including their names, operating system details, and readiness state. From this list, simply select the VM you intend to move, in my case, the virtual machine named VMToMigrate.
Selecting the machine at this stage ensures that all subsequent replication and configuration settings apply to the correct workload. It also allows Azure Migrate to pull in the machine’s metadata, which will be used to define disk mappings, network configuration, and the appropriate target settings for Azure Local. Once the VM is selected, you can proceed with configuring the replication parameters and preparing it for migration into your Azure Local cluster.
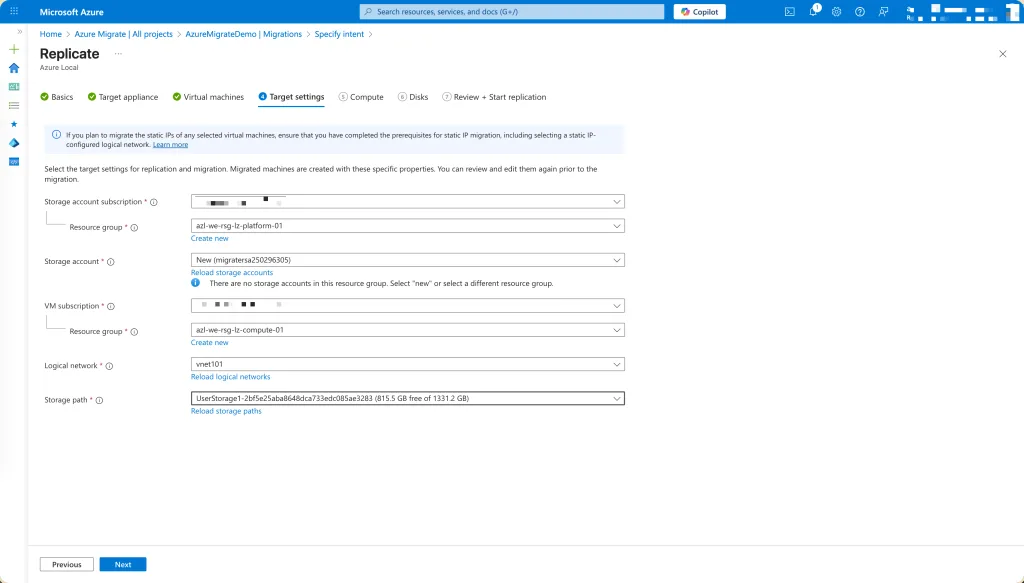
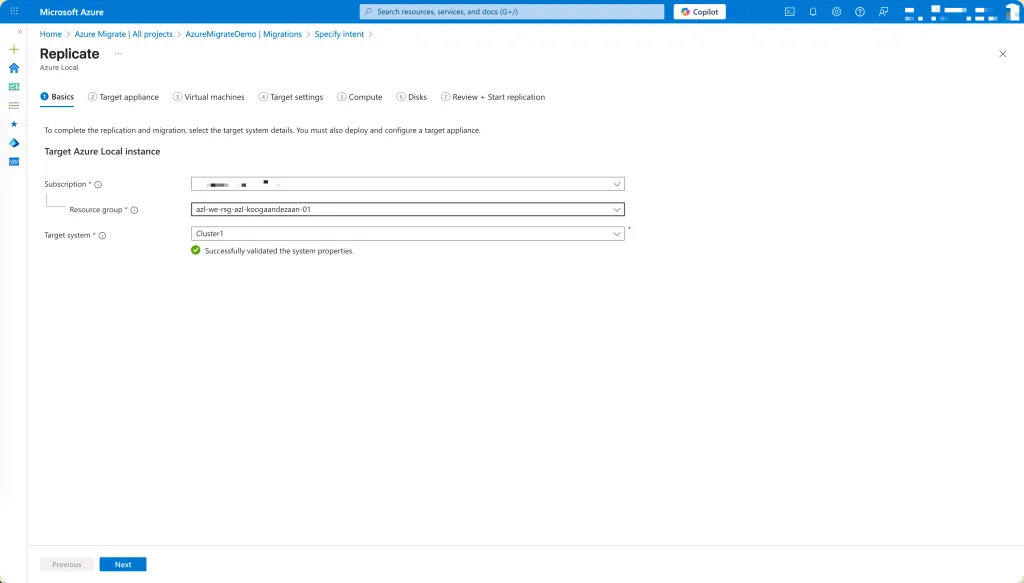
Once the virtual machine has been selected, the next step is to provide the correct Resource Group and networking configuration for the target environment in Azure Local. These settings ensure that the migrated VM lands in the appropriate logical structure and can communicate properly once it is running on your Azure Local cluster.
Begin by selecting the Resource Group that will contain the migrated virtual machine. This should ideally be the same resource group used for your Azure Local workloads to maintain consistency and simplify management. For example, in my environment I am using a dedicated Azure Local resource group, which keeps all related resources tightly organized and aligned with my naming conventions.
Next, choose the appropriate virtual network and subnet within Azure Local. These settings determine where the VM will reside from a networking perspective once the migration is complete. It is important to select the correct subnet, especially if your VM relies on specific IP ranges, firewall rules, or routing paths. Because my VMToMigrate already resides in the same subnet as the Azure Local cluster, matching it here ensures a smooth transition without requiring additional network reconfiguration after migration.
By carefully selecting the proper resource group and networking information, you ensure that the migrated virtual machine integrates seamlessly into your Azure Local environment and is immediately operational once the migration process completes.
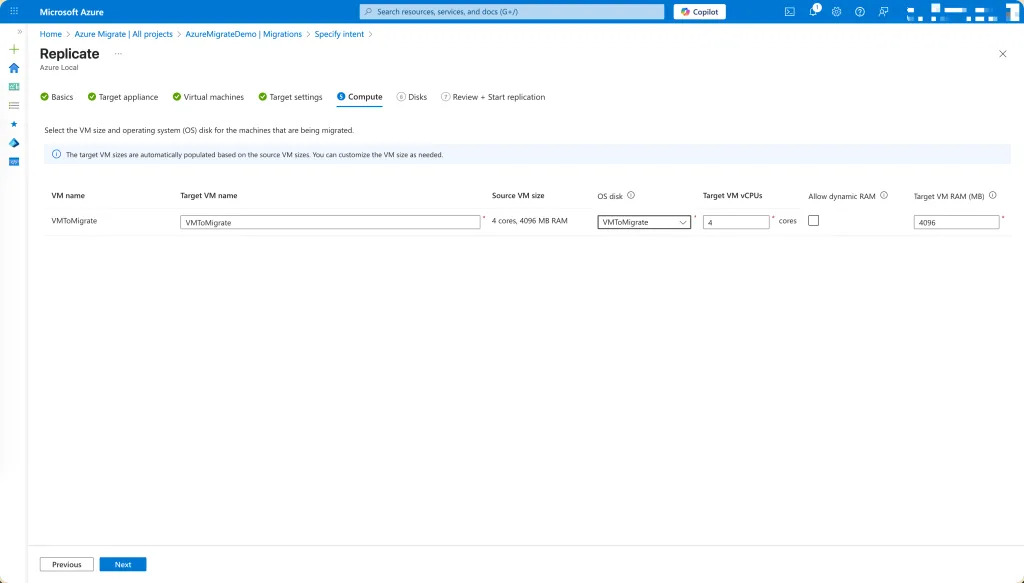
After selecting the resource group and networking configuration, the next step is to define how the virtual machine will be provisioned on Azure Local. This includes assigning a name, specifying the number of vCPUs, and configuring the memory allocation for the machine once it is migrated.
Begin by giving the virtual machine a clear and descriptive name that aligns with your naming conventions. In my case, I am using a structure that reflects the environment, location, and purpose of the VM. This ensures consistent management and helps quickly identify the system within the Azure Local cluster. For example, azl-we-vm-migrated-01 would be a suitable name for a workload in the Western Europe region running on Azure Local.
Once the name is set, configure the compute resources. Azure Migrate automatically collects performance data from the source VM, allowing you to size the machine appropriately. Based on the usage metrics gathered during discovery, you can determine how many vCPUs and how much memory should be assigned to achieve optimal performance on Azure Local. For my virtual machine, I am allocating a sensible configuration that aligns with its existing workload profile, ensuring that it performs at least as well as it did on Hyper‑V while taking advantage of the efficiency and resiliency provided by Azure Local.
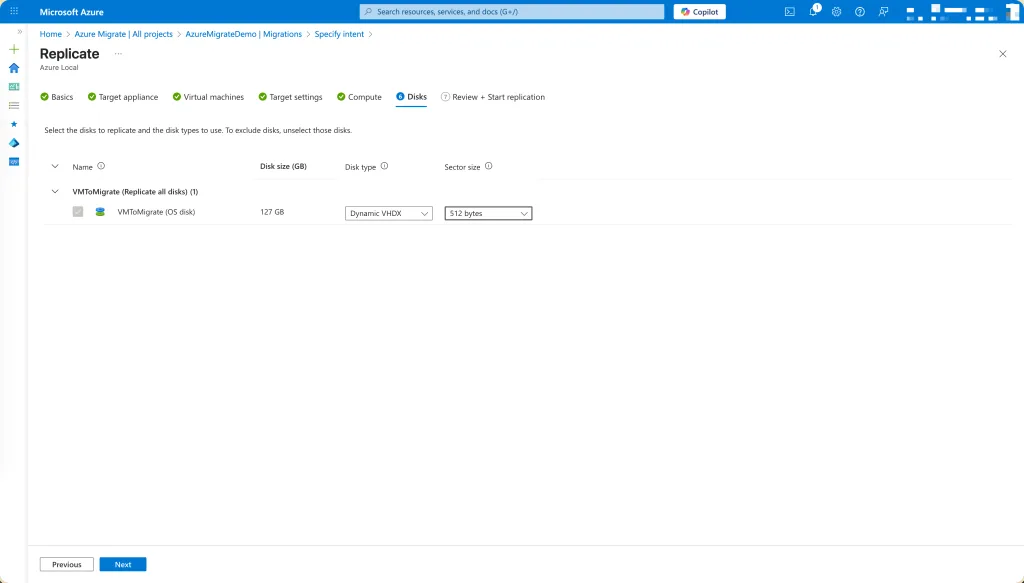
With the compute configuration in place, the next step is to define the storage settings for the virtual machine once it is migrated into Azure Local. Begin by selecting the appropriate disk type based on the workload’s performance needs. Azure Migrate presents the available disk options, typically ranging from standard storage for lightweight workloads to high‑performance disks for applications requiring lower latency and faster throughput. Choose the type that best aligns with the VM’s existing disk behavior and the performance characteristics observed during the discovery phase.
In addition to disk type, you must specify the block size for the storage configuration. Selecting the correct block size helps optimize disk performance after migration, especially for workloads with specific I/O patterns. Matching the block size to the workload’s profile ensures smoother operation and reduces unnecessary overhead once the VM is running on Azure Local.
After providing these storage details, you can begin the validation process. Validation performs a series of checks to confirm that all configuration parameters, networking, compute, storage, and prerequisites—meet the requirements for replication. If any inconsistencies or missing components are detected, Azure Migrate highlights them so they can be corrected before proceeding. This step is essential to ensure a smooth and reliable migration path.
Once the validation completes successfully, the VM is fully prepared for the next phase. From here, you can initiate replication, allowing Azure Migrate to begin transferring the virtual machine’s disks and configuration data into Azure Local. This marks the transition from preparation to execution, bringing the workload one step closer to running natively on your Azure Local cluster.
Migration
Once the replication has completed successfully and the virtual machine is fully synchronized with your Azure Local environment, you can proceed to the final step: migrating the server. At this stage, the heavy lifting has already been done, discovery, validation, configuration, and replication, and the workload is now ready to transition into Azure Local.
To initiate the migration, return to your Azure Migrate project in the Azure Portal. In the project overview, navigate to the Migrations section. Select Migrate
This step launches the actual migration workflow, where Azure Migrate shuts down (if chosen), prepares, and transfers the final delta changes to ensure the VM in Azure Local is fully synchronized and ready to boot. The migration process is designed to be predictable and controlled, minimizing downtime and ensuring that the target environment reflects the most recent state of the source machine.
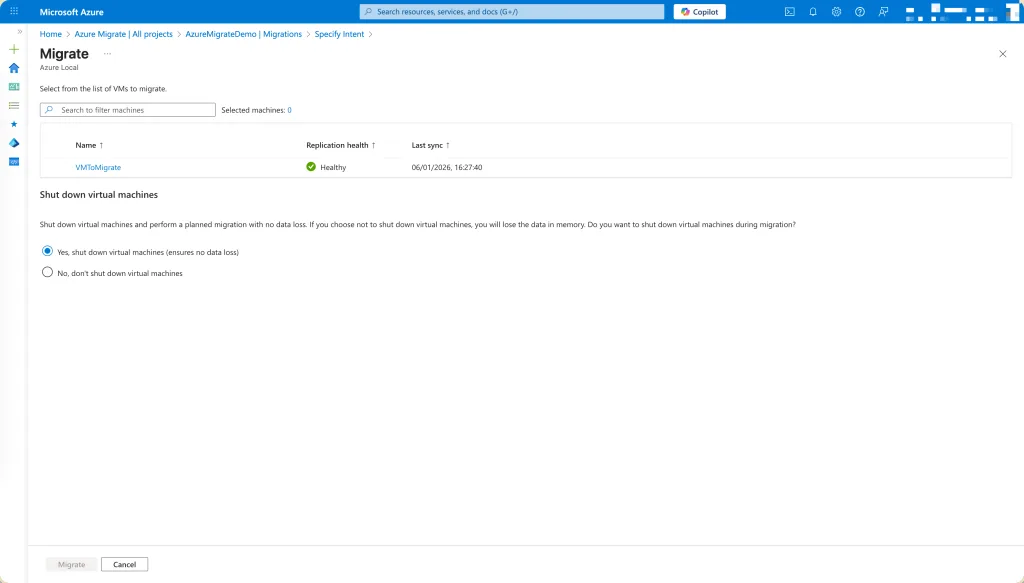
With replication complete and the virtual machine fully synchronized, you can now proceed with the final migration step. In the Azure Migrate project, navigate to the Migrations section where all replicated machines are listed along with their readiness status. From here, simply select the virtual machine you want to migrate, in this case, VMToMigrate, and click Migrate.
This action triggers the cut‑over process, during which Azure Migrate finalizes any remaining data synchronization and prepares the VM to run natively on your Azure Local cluster. Once initiated, the portal provides real‑time progress updates, ensuring full visibility as the workload transitions from your Hyper‑V environment into Azure Local.
In my case there was an error. The error that I have got is:
The discovered static IP address ‘172.16.100.104’ of NIC with Id ‘Microsoft:3A63B04E-AEF0-4E02-A83D-D6121A7FBB7D\58340942-6DEB-47D4-9861-86126D76B6E4’ falls outside the IP pool range(s) ‘[172.16.100.200, 172.16.100.215]’ of the logical network with Id of ‘/subscriptions/<subscriptionId>/resourceGroups/azl-we-rsg-azl-koogaandezaan-01/providers/Microsoft.AzureStackHCI/logicalNetworks/vnet101’.
So in basics: The IP Address is not a match with VNET101 Logical Network. You need to make sure that the ip address of the server fits in the selected logical network.
I changed the ip to an ip within the range and had to stop the replication and create a new replication.
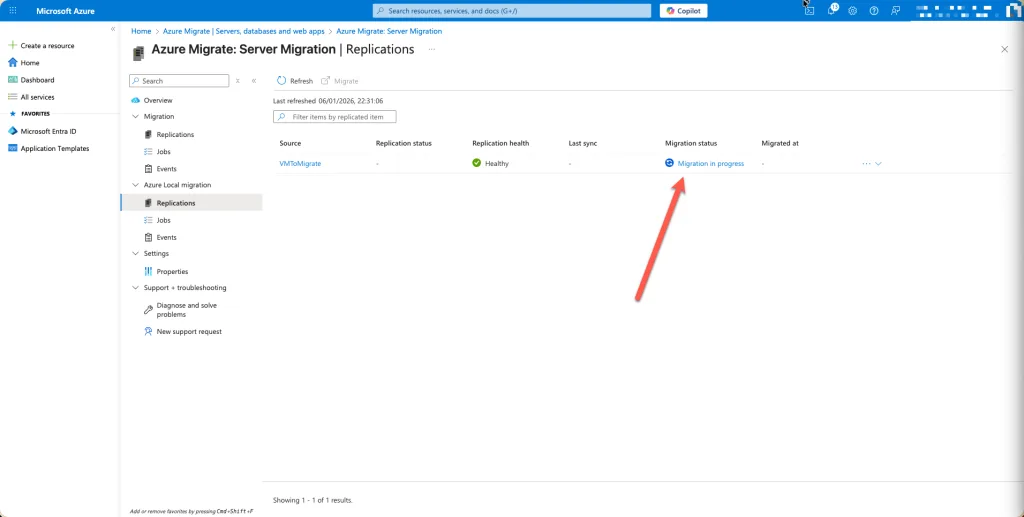
When the replication is finalized, we can migrate the server.
Before
After
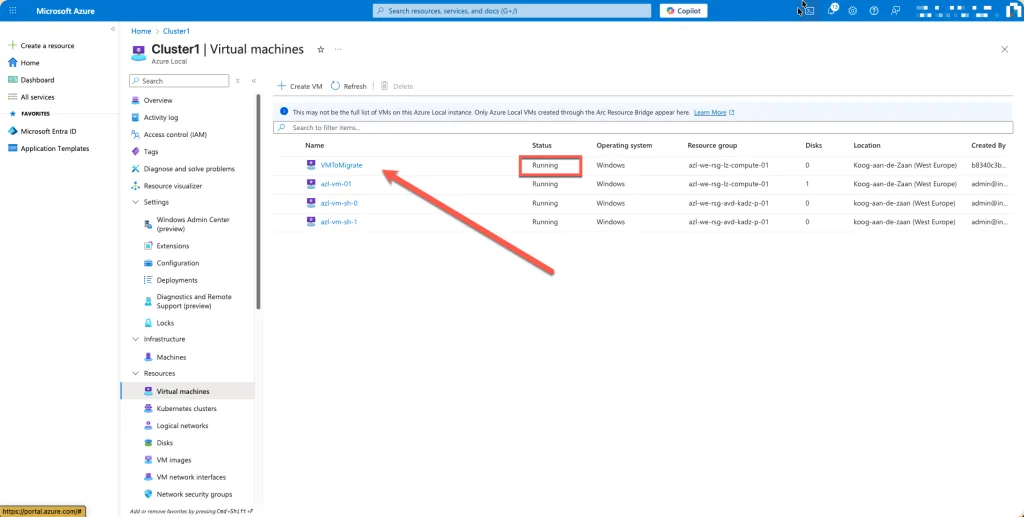
And that is how it is done ! Enjoy migrating
IT Professional on a journey to discover the cloud platforms and become certified and an expert.
A Blog that follows the journey to get to the Cloud.
Azure Local | Azure Bicep | Azure Virtual Desktop | Powershell | Azure Certified | MCSA | Microsoft 365