Are you still using Microsoft Remote Desktop Services (RDS) and finding it difficult to manage? Are you looking for a better way to provide your employees with remote access to apps and data? Look no further than Azure Virtual Desktop (AVD). In this blog, I will explain how to replace RDS with AVD and the benefits of doing so, but also how to setup. This Azure Virtual Desktop environment will be used in the blog posts to come about Intune, Azure Bicep, Endpoint Privileged Management and Windows LAPS with Azure Active Directory.
Why Replace Microsoft Remote Desktop Services with Azure Virtual Desktop?
I Will break down why AVD is a better choice than RDS and how it can help businesses increase productivity and efficiency.
The limitations of Microsoft Remote Desktop Services
Microsoft Remote Desktop Services is a remote desktop solution that allows users to connect to a virtual machine or a session-based desktop remotely. On the surface, RDS seems like a good choice. However, there are several limitations associated with it.
One of the biggest limitations of RDS is its scalability. It is difficult to scale RDS solutions, and as a result, it is not ideal for businesses with high user volumes. Additionally, RDS requires a lot of maintenance, making it difficult to manage.
Another limitation of RDS is that it only works with Windows-based applications. This means that if you have any web-based, Linux, or Mac applications, you won’t be able to use them with RDS. This can be a major roadblock for businesses that rely on applications outside of the Windows ecosystem.
Why Azure Virtual Desktop is the better choice
Azure Virtual Desktop, on the other hand, is a cloud-based virtual desktop solution that can easily scale to meet the needs of businesses of all sizes. AVD supports a variety of operating systems, including Windows, Linux, and Mac. This means that businesses can use all of their applications, regardless of which platform they run on.
Another advantage of AVD is that it’s easily customizable. You can create templates that include the applications and settings you need, and then deploy them to different user groups. This level of customization makes AVD a more flexible solution compared to RDS.
AVD also offers more robust security features than RDS. With AVD, you can manage access to virtual machines and data more easily. Additionally, AVD is hosted in Azure, which means that it’s protected by Azure’s security features, which are some of the best in the business.
Benefits of Azure Virtual Desktop
- Lower costs
- Scalability
- Security and Compliance
- User experience
Lower costs
One of the biggest advantages of AVD is the cost savings it can provide. With RDS, you would typically need to set up and maintain your own on-premises infrastructure to host your virtual desktops. With AVD, you can leverage the power and scalability of Azure, reducing your hardware and maintenance costs.
Scalability
AVD provides the ability to easily scale your virtual desktops up or down based on demand. This means you can quickly and easily add or remove virtual desktops as needed, without having to worry about infrastructure limitations.
Security and compliance
With AVD, you can take advantage of the built-in security features of Azure, including Azure Active Directory and Azure Security Center. This provides a more secure environment for your virtual desktops and ensures compliance with industry regulations.
User experience
AVD provides a more consistent and streamlined user experience, regardless of device or location. This means your users can easily access their virtual desktops from anywhere, without having to worry about the limitations of RDS.
How to setup Azure Virtual Desktop multi session
Resource group
Login to https://portal.azure.com and browse to resource groups (link)
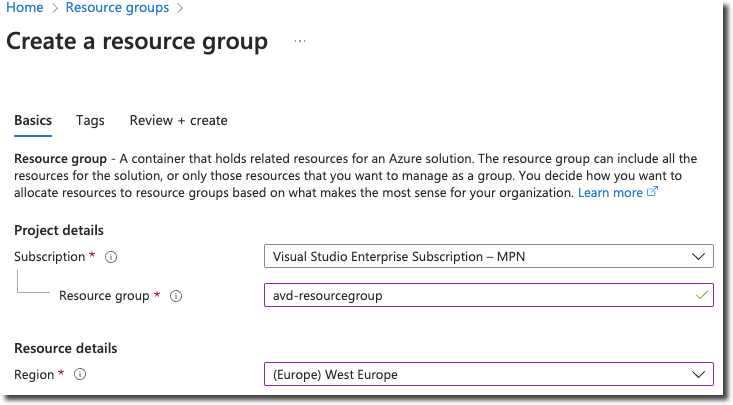
Create a new resource group
Virtual Network
Login to https://portal.azure.com and browse to virtual networks (link)
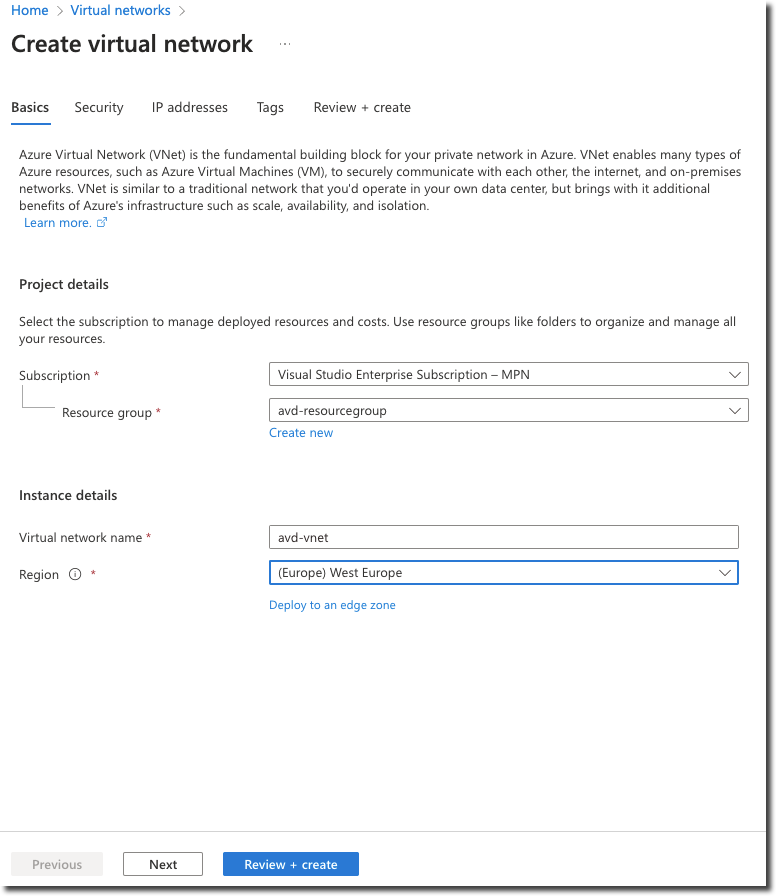
Create a new virtual network located in the new created resource group and click Next
At the security tab, deselect the option if are enabled and click Next
At the IP addresses tab, change the ip address space if required and click Next
At the Tags tab, enter a tag if required and click Next or Review and Create
Azure Virtual Desktop
Login to https://portal.azure.com and browse to Azure Virtual Desktop (link)
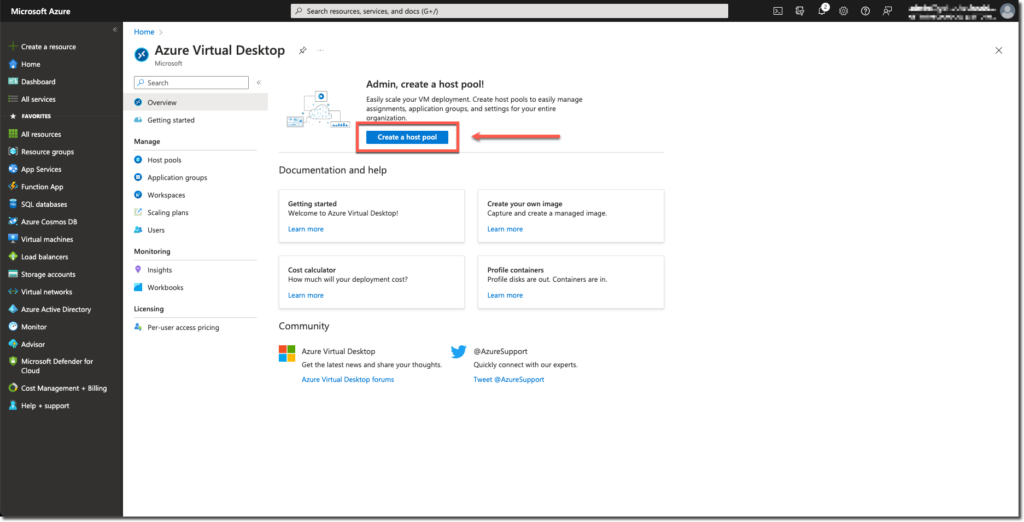
Click on Create a host pool
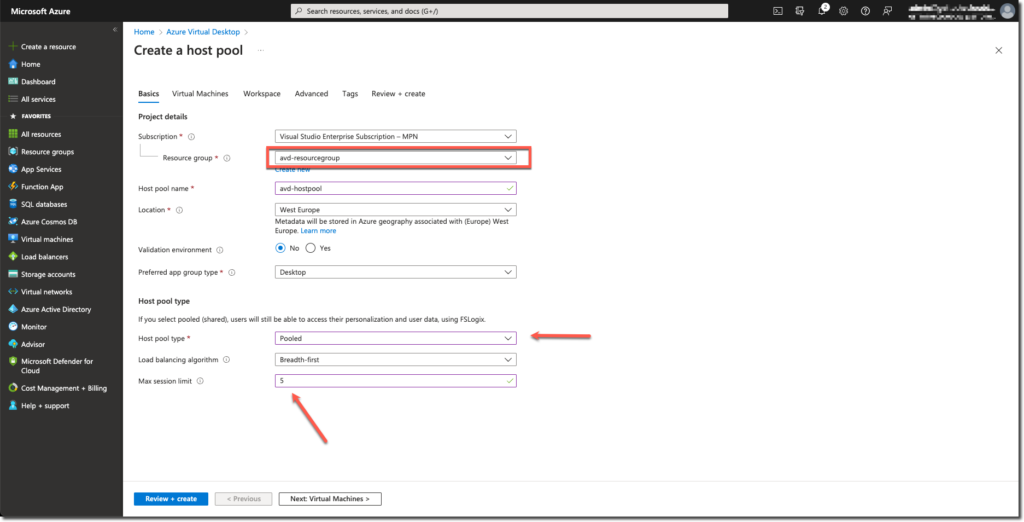
Select the early created resource group and enter a Host pool name. The type must be changed to Pooled with a Max session limit as wanted. If you create multiple Azure Virtual Desktops you can enter the number per machine limit.
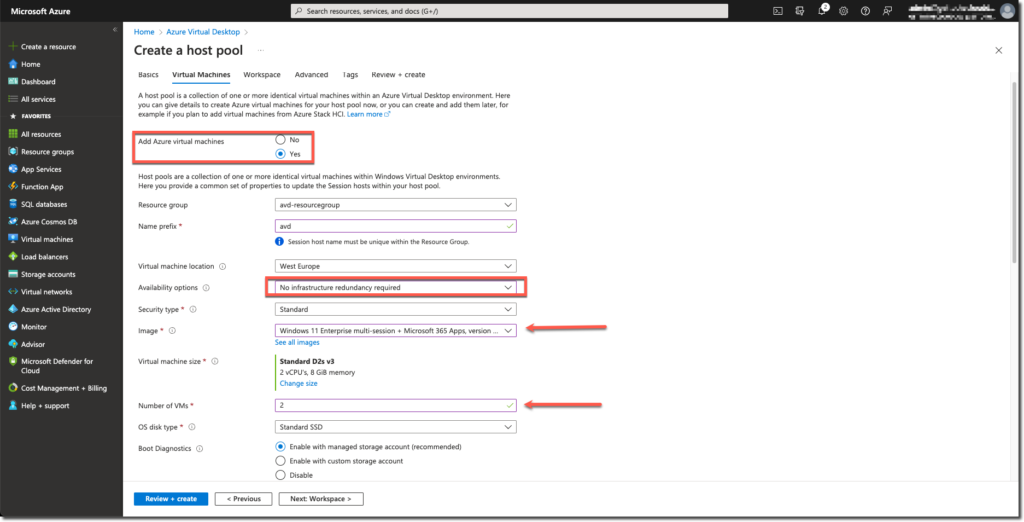
Add Azure Virtual Machines and locate them in the same resource group (that was created before). Enter a prefix name (in my case it is called AVD). I disabled for the test the availability options but you can set them if it is needed. As image I choose for Windows 11 Enterprise multi-session with Microsoft 365 apps version 22h2 and entered a total number of 2 virtual machines (which means I can connect with 10 users to 2 machines)
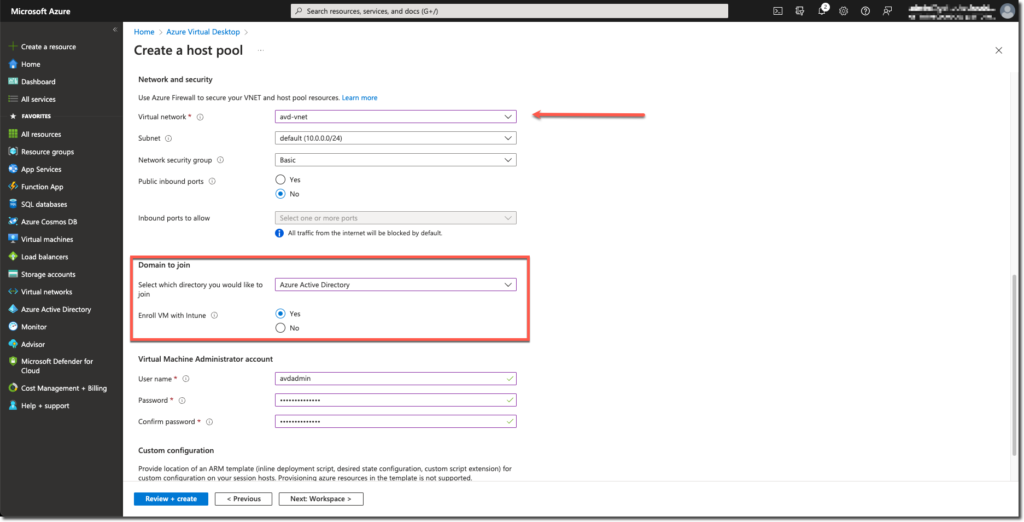
I selected the virtual network which I created before. Select Azure Active Directory and Enroll VM with Intune to YES so the virtual machine can be managed within Intune and you can login with just an Azure Active Directory account.
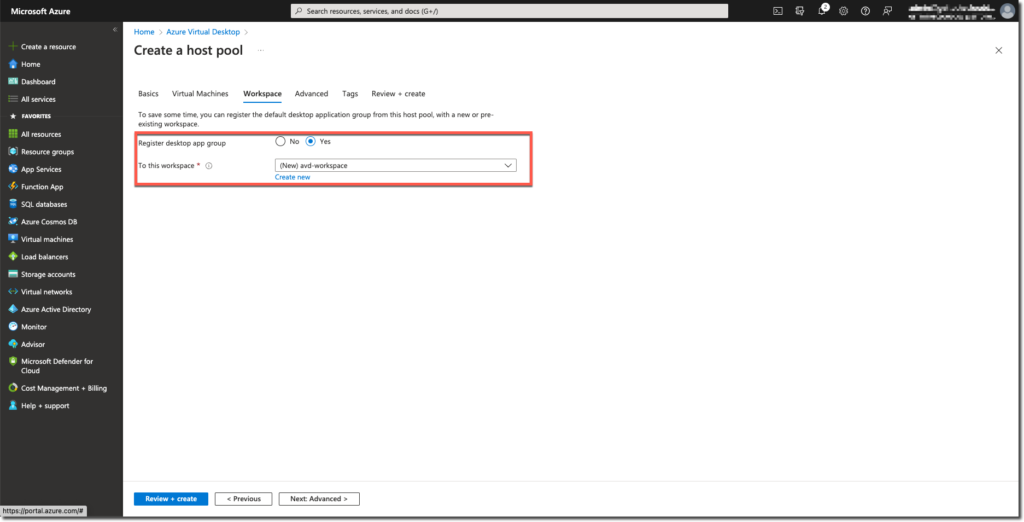
Register the desktop app group and create a new workspace.
At the Advanced tab, you can enable diagnostics settings by sending logs to a logs workspace. I did not select that but it is possible
At the Tags tab, you can add your personal tags if required
After the review, click on Create
Settings to connect
After the creation of the Azure Virtual Desktop, you need to do some settings.
User group
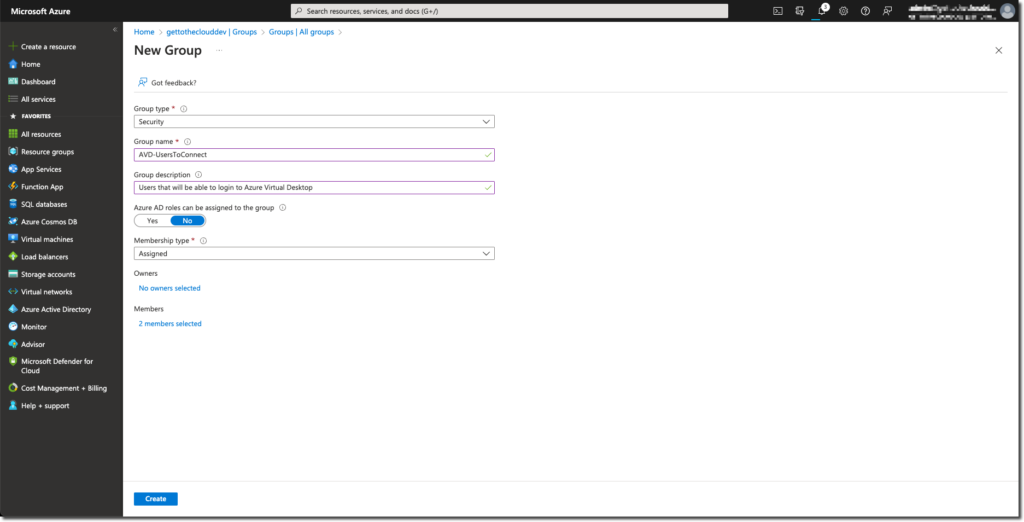
Create a User group for Users that will be able to sign in to the Azure Virtual Desktop
Browse to Azure Active Directory groups and create a new group and add the users
Permissions
You need to assign the just created group permissions to login to the Virtual Machines that will be created. Because there is a possibility that you create a large amount of machines, we are setting the permissions for the group on the Resource group.
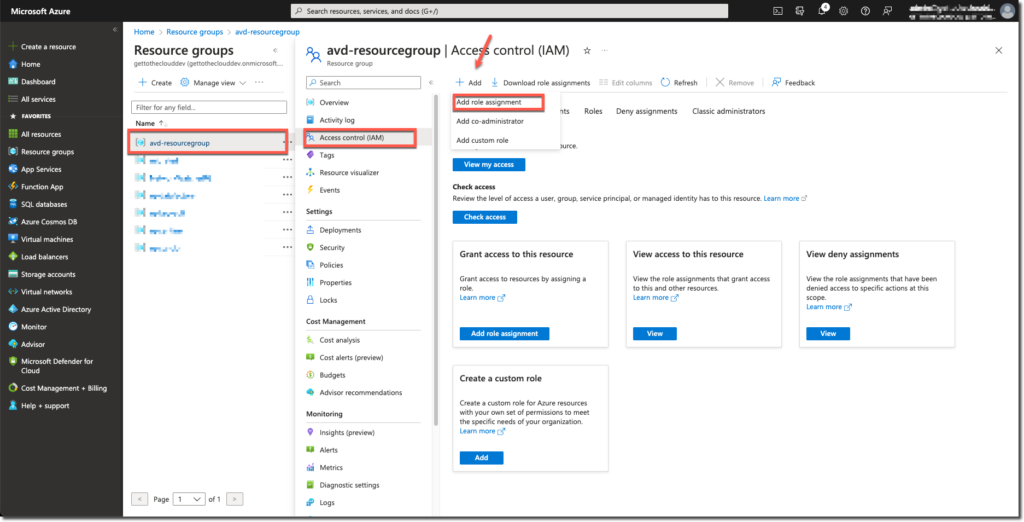
Browse to the Resource group and select Access control (IAM), click Add and choose for Add role assignment
Select the assignment type: Job function roles
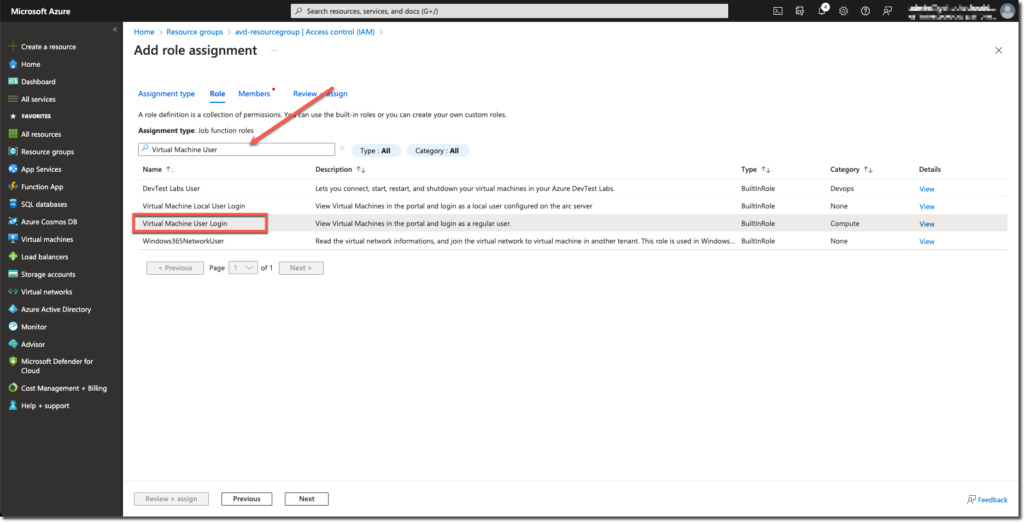
Search for Virtual Machine User Login and select that role
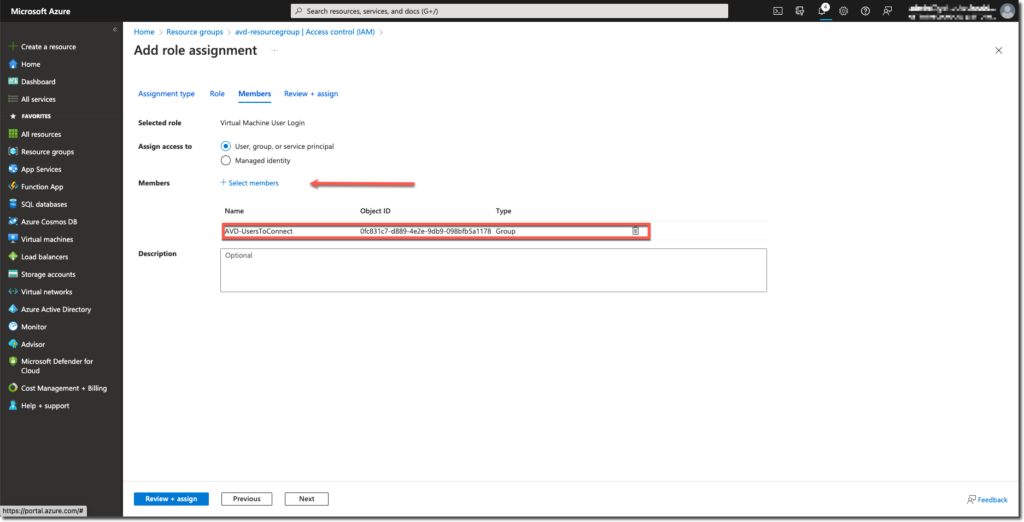
Add the group created before with the users that must connect to the Azure Virtual Desktop and click review + assign
Hostpool settings
Browse to Azure Virtual Desktop and select Host pools
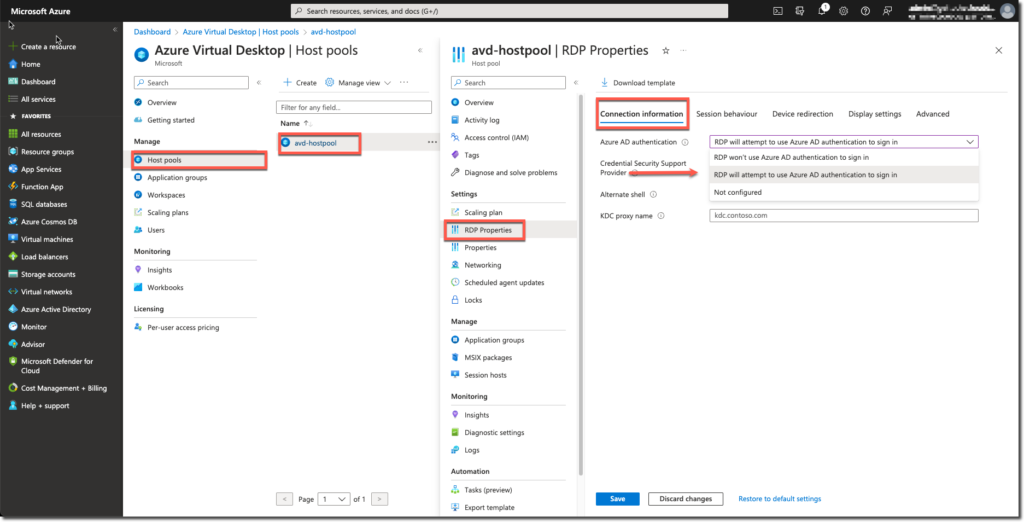
In the RDP Properties of the host pool, select RDP will attempt to use Azure AD authentication to sign in
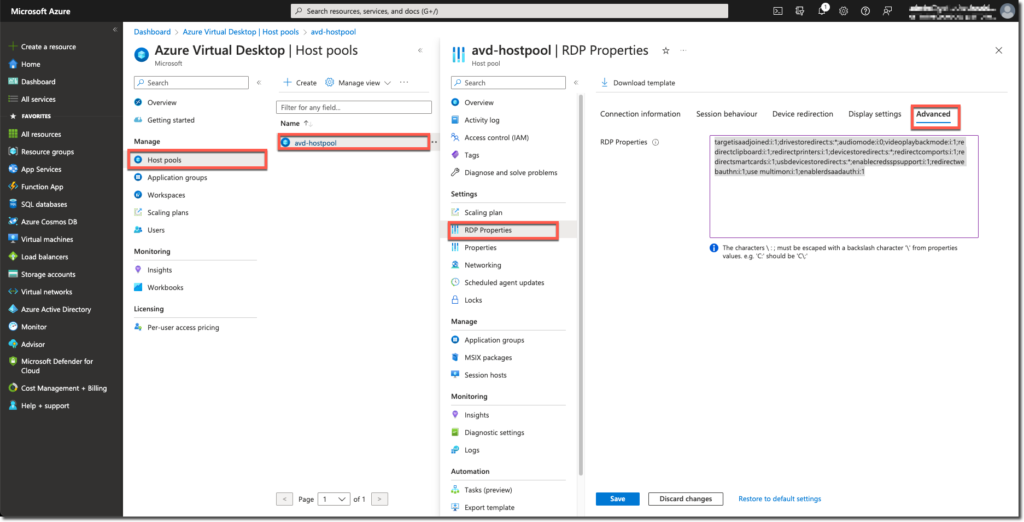
At the Advanced tab you need to add : targetisaadjoined:i:1;
Application group assignment
The application group (the session host connection) needs to be assigned to the users.
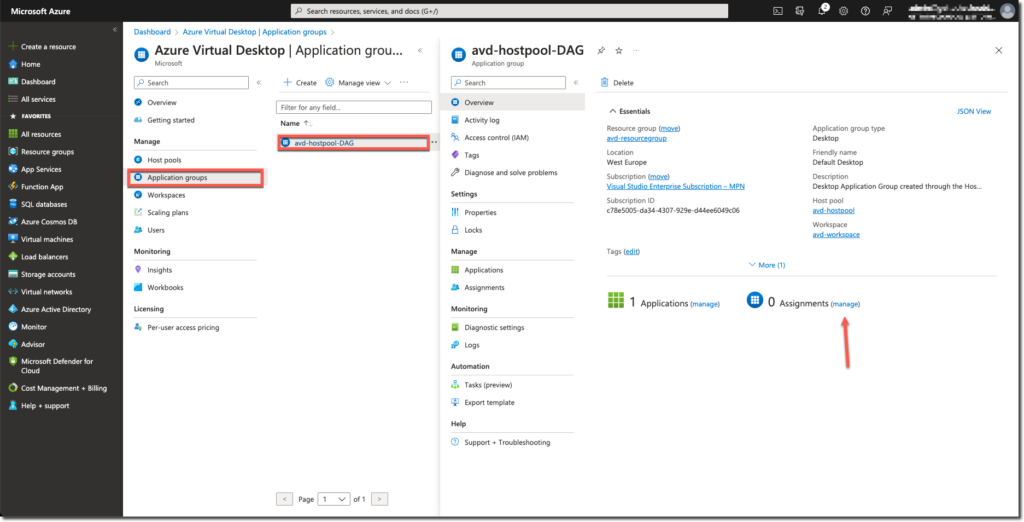
Browse to the settings of the Application group and click manage next to Assignments
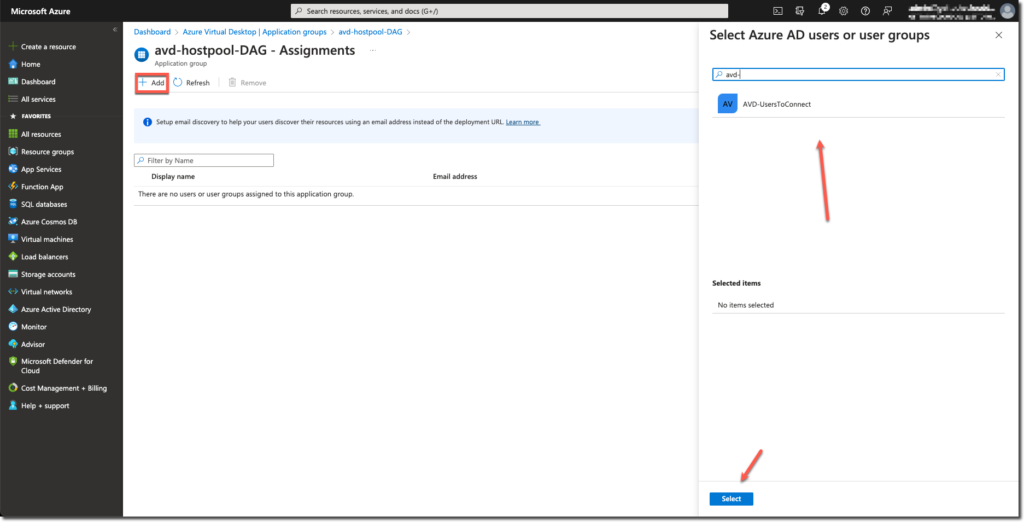
Click Add and search for the group you created before.
Connecting to Azure Virtual Desktop
To connect to the Azure Virtual Desktop is possible through multiple ways.
Browser
https://client.wvd.microsoft.com/arm/webclient/ for the browser with these requirements:
| Web browser | Supported operating system | Notes |
|---|---|---|
| Microsoft Edge | Windows, macOS, Linux, Chrome OS | Version 79 or later |
| Google Chrome | Windows, macOS, Linux, Chrome OS | Version 57 or later |
| Apple Safari | macOS | Version 11 or later |
| Mozilla Firefox | Windows, macOS, Linux | Version 55 or later |
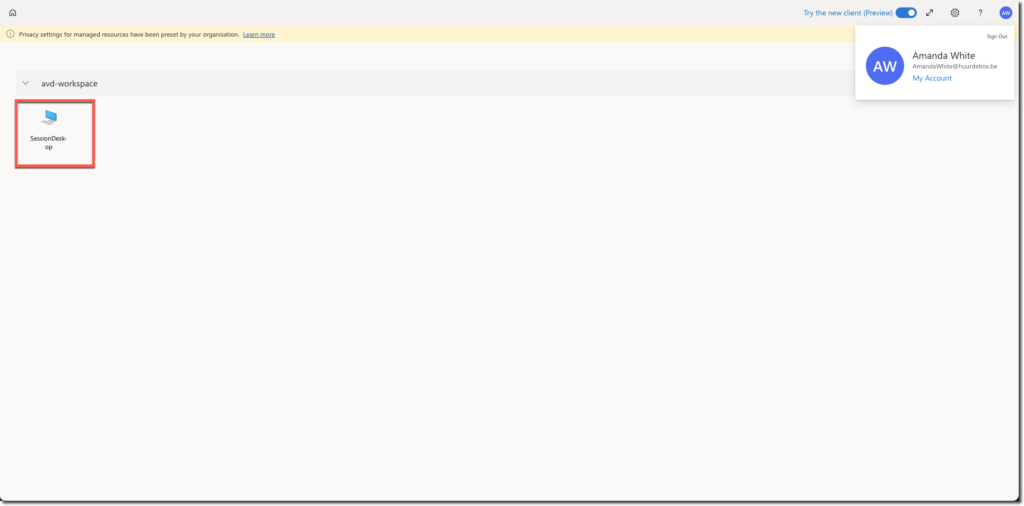
Remote Desktop Client
In the Remote Desktop Client you can add a workspace by adding this url https://rdweb.wvd.microsoft.com
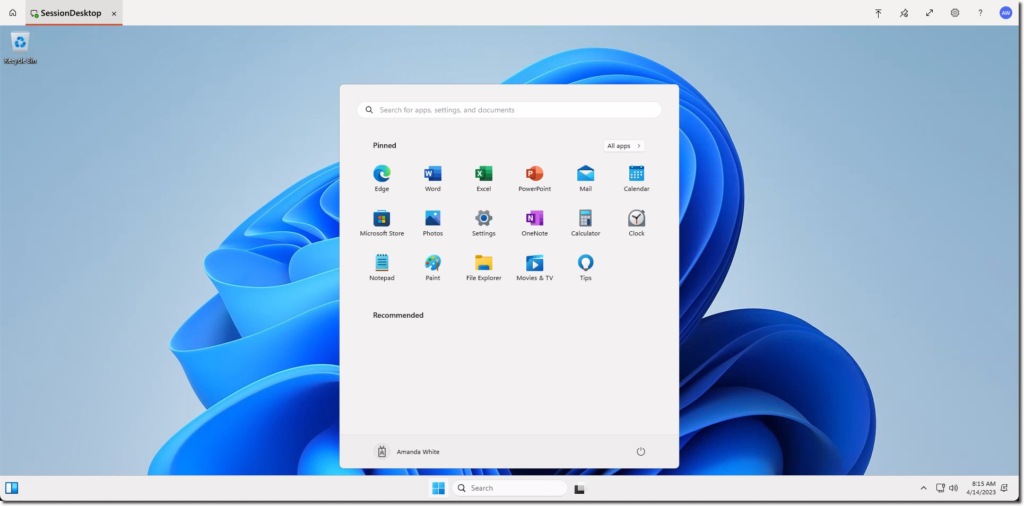
It will prompt you for a login. Login with the user account and the SessionHost icon will appear.
In the next post I will deploy Azure Virtual Desktop as above through Azure Bicep