In a previous post, Azure Bicep | Deploy Virtual Machines – GetToTheCloud, we have seen how to use Azure Bicep to deploy resources. To do these kind of actions there are multiple possibilities. A Counter part of this is using Terraform. A big difference is that Terraform is multi-cloud and Azure Bicep only to Azure. So let’s see when we use Terraform what we need to do to achieve the same result.
Azure App Registration
Terraform is using an app registration for the deployment of the resources. Let’s create that.
First we need to create an app registration to have a service principal. Login to https://portal.azure.com and browse to Azure Active Directory / App Registrations. Once there click on New registration and fill in the form with a name and register the application. Once created the app registration browse to the certificates & secrets tab in the app registration. Create a new client secret and write down, we will need this later on.
Now browse to subscriptions
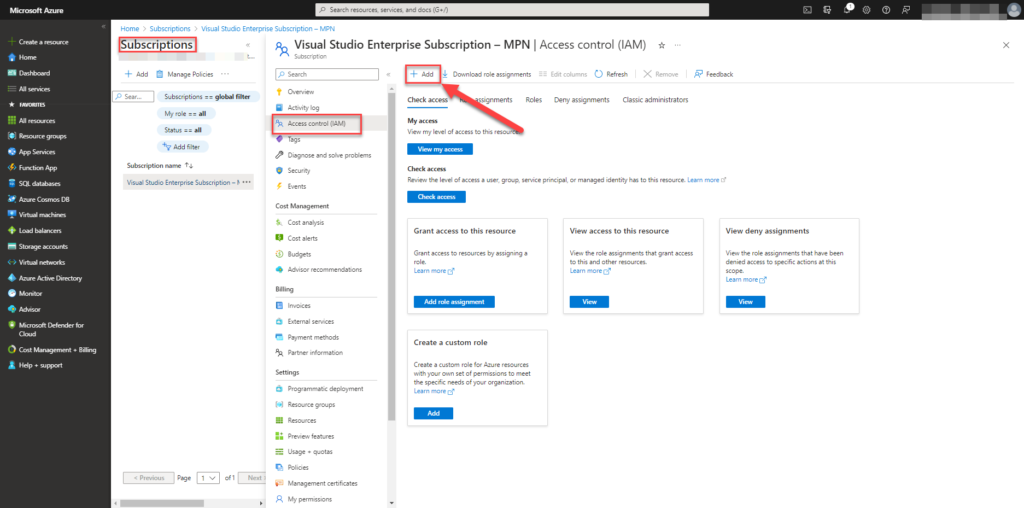
Select your subscription and click Access control (IAM). Select Add to add permissions.
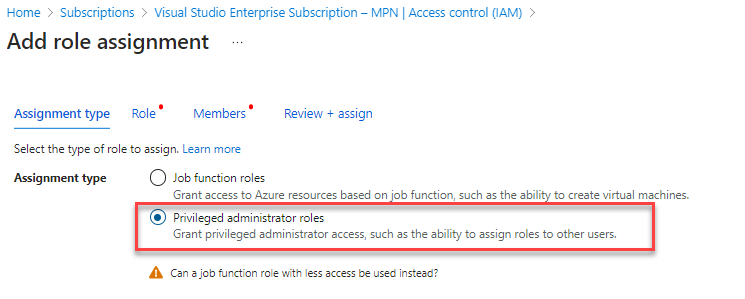
Select Privileged administrator roles and click Role
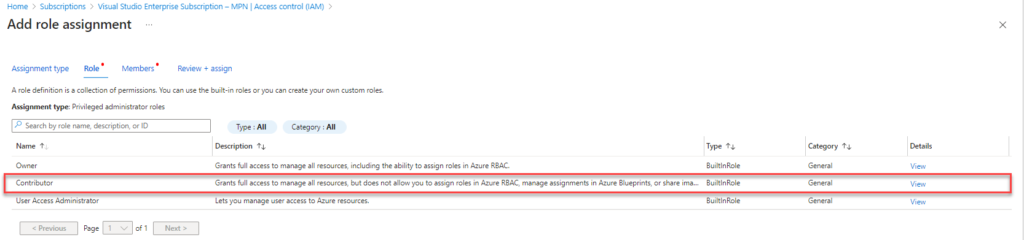
Select Contributor and click Members
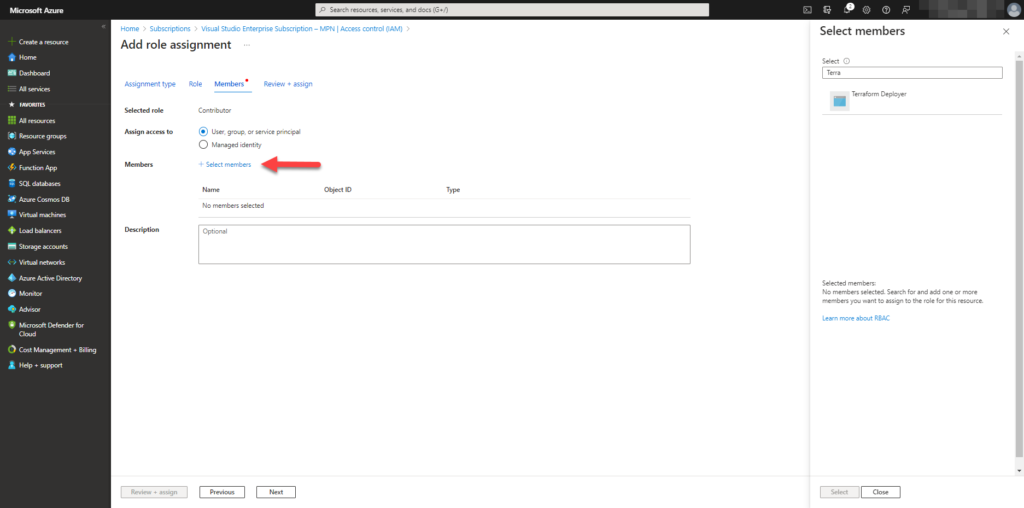
Select Select Members and search for you app registration which you created at the first step. In this case I named the app Terraform deployer.
Now we have given permissions to the app on subscription level, we need to write down some information:
- subscriptionId
- applicationId (clientId)
- tenantId
- clientsecret
Goal
In this example we will start deploying some Virtual Machines. These Virtual Machines can be used for a testlab.
| Virtual Machine | Ip Address | Purpose |
| DC01 | 10.10.0.4 | Domain Controller |
| EX01 | 10.10.0.5 | Exchange Server |
| WIN11 | 10.10.0.6 | Client for Access to servers over RDP |
So three virtual machines, network and network security groups, public ips and storage will be created with Terraform to Azure.
Terraform
Now we have an app registration with the correct permissions for terraform, we can start creating the files.
- testdomain.tf
- variables.tf — It is used to declare the variables which are to be used in TF code. Even you can initialize the default values as well.
- terraform.tfvars — It is used to define the variables declared in variables.tf (if and only if it is not already defined in variables.tf)
In this case I use both files, variables.tf and terraform.tfvars, to understand the working of those files.
variables.tf
In this file you define the global variables to reuse in the different terraform files.
variable "node_location" {
  type = string
}
variable "resourcegroup" {
  type = string
}
variable "node_address_space" {
  default = ["10.0.0.0/16"]
}
#variable for network range
variable "node_address_prefix" {
  default = "10.0.1.0/24"
}
variable "virtualnetwork" {
  type = string
}
As you can see, I left open node_location, resourcegroup and virtualnetwork. This information will come from terraform.tfvars.
terraform.tfvars
node_location  = "westeurope"
resourcegroup  = "TestDomainTerraform"
virtualnetwork = "TerraformTestDomain"
testdomain.tf
# azure connection
provider "azurerm" {
  # whilst the `version` attribute is optional, we recommend pinning to a given version of the Provider
  subscription_id = "xxx-xxx-xxxx-xxxx"
  client_id       = "xxx-xxx-xxxx-xxxx"
  client_secret   = "xxx-xxx-xxxx-xxxx"
  tenant_id       = "xxx-xxx-xxxx-xxxx"
  version         = "=2.0.0"
  features {}
}
Fill out the connection details that where written down earlier.
variable "DCcomputername" {
  default = "DC01"
}
variable "EXcomputername" {
  default = "EX01"
}
variable "WIN11computername" {
  default = "WIN11"
}
Variable names for the different machines we would like to deploy.
resource "azurerm_resource_group" "rg" {
  name     = var.resourcegroup
  location = var.node_location
}
resource "azurerm_virtual_network" "vnet" {
  name                = var.virtualnetwork
  address_space       = var.node_address_space
  location            = var.node_location
  resource_group_name = azurerm_resource_group.rg.name
}
Create a resource group and virtual network using the variables set in variables.tf.
resource "azurerm_network_security_group" "nsgdc" {
  name                = "NSG-${var.DCcomputername}"
  location            = azurerm_resource_group.rg.location
  resource_group_name = azurerm_resource_group.rg.name
  security_rule {
    name                       = "allow-port-5985"
    priority                   = 100
    direction                  = "Inbound"
    access                     = "Allow"
    protocol                   = "Tcp"
    source_port_range          = "*"
    destination_port_range     = "5985"
    source_address_prefix      = "*"
    destination_address_prefix = "*"
  }
}
resource "azurerm_network_security_group" "nsgex" {
  name                = "NSG-${var.EXcomputername}"
  location            = azurerm_resource_group.rg.location
  resource_group_name = azurerm_resource_group.rg.name
  security_rule {
    name                       = "allow-port-5985"
    priority                   = 100
    direction                  = "Inbound"
    access                     = "Allow"
    protocol                   = "Tcp"
    source_port_range          = "*"
    destination_port_range     = "5985"
    source_address_prefix      = "*"
    destination_address_prefix = "*"
  }
  security_rule {
    name                       = "allow-port-443"
    priority                   = 101
    direction                  = "Inbound"
    access                     = "Allow"
    protocol                   = "Tcp"
    source_port_range          = "*"
    destination_port_range     = "443"
    source_address_prefix      = "*"
    destination_address_prefix = "*"
  }
}
resource "azurerm_network_security_group" "nsgwin11" {
  name                = "NSG-${var.WIN11computername}"
  location            = azurerm_resource_group.rg.location
  resource_group_name = azurerm_resource_group.rg.name
  security_rule {
    name                       = "allow-port-3389"
    priority                   = 100
    direction                  = "Inbound"
    access                     = "Allow"
    protocol                   = "Tcp"
    source_port_range          = "*"
    destination_port_range     = "3389"
    source_address_prefix      = "*"
    destination_address_prefix = "*"
  }
}
Adding the network security groups for the virtual machines with the rules. In the NAME we use a variable that we define earlier.
resource "azurerm_subnet" "frontendsubnet" {
  name                 = "frontendSubnet"
  resource_group_name  = azurerm_resource_group.rg.name
  virtual_network_name = azurerm_virtual_network.vnet.name
  address_prefix       = var.node_address_prefix
}
resource "azurerm_public_ip" "expublicip" {
  name                = "${var.EXcomputername}-PIP"
  location            = var.node_location
  resource_group_name = azurerm_resource_group.rg.name
  allocation_method   = "Dynamic"
  sku                 = "Basic"
}
resource "azurerm_public_ip" "win11publicip" {
  name                = "${var.WIN11computername}-PIP"
  location            = var.node_location
  resource_group_name = azurerm_resource_group.rg.name
  allocation_method   = "Dynamic"
  sku                 = "Basic"
}
Add the subnet and the public ip’s for the EX01 and WIN11
resource "azurerm_network_interface" "dcnic" {
  name                = "${var.DCcomputername}-nic"
  location            = var.node_location
  resource_group_name = azurerm_resource_group.rg.name
  ip_configuration {
    name                          = "ipconfig1"
    subnet_id                     = azurerm_subnet.frontendsubnet.id
    private_ip_address_allocation = "Dynamic"
  }
}
resource "azurerm_network_interface" "exnic" {
  name                = "${var.EXcomputername}-nic"
  location            = var.node_location
  resource_group_name = azurerm_resource_group.rg.name
  ip_configuration {
    name                          = "ipconfig1"
    subnet_id                     = azurerm_subnet.frontendsubnet.id
    private_ip_address_allocation = "Dynamic"
    public_ip_address_id          = azurerm_public_ip.expublicip.id
  }
}
resource "azurerm_network_interface" "win11nic" {
  name                = "${var.WIN11computername}-nic"
  location            = var.node_location
  resource_group_name = azurerm_resource_group.rg.name
  ip_configuration {
    name                          = "ipconfig2"
    subnet_id                     = azurerm_subnet.frontendsubnet.id
    private_ip_address_allocation = "Dynamic"
    public_ip_address_id          = azurerm_public_ip.win11publicip.id
  }
}
Creating the virtual nic’s for the machines and adding the public ip’s to the nic’s.
resource "azurerm_network_interface_security_group_association" "nsgexassociation" {
  network_interface_id      = azurerm_network_interface.exnic.id
  network_security_group_id = azurerm_network_security_group.nsgex.id
}
resource "azurerm_network_interface_security_group_association" "nsgwin11association" {
  network_interface_id      = azurerm_network_interface.win11nic.id
  network_security_group_id = azurerm_network_security_group.nsgwin11.id
}
Associate the network security groups with the virtual nics.
resource "azurerm_windows_virtual_machine" "DCvirtualmachine" {
  name                  = var.DCcomputername
  location              = var.node_location
  resource_group_name   = azurerm_resource_group.rg.name
  network_interface_ids = [azurerm_network_interface.dcnic.id]
  size                  = "Standard_B2s"
  admin_username        = "adminuser"
  admin_password        = "Password123!"
  source_image_reference {
    publisher = "MicrosoftWindowsServer"
    offer     = "WindowsServer"
    sku       = "2022-datacenter"
    version   = "latest"
  }
  os_disk {
    caching              = "ReadWrite"
    storage_account_type = "Standard_LRS"
  }
}
resource "azurerm_windows_virtual_machine" "EXvirtualmachine" {
  name                  = var.EXcomputername
  location              = var.node_location
  resource_group_name   = azurerm_resource_group.rg.name
  network_interface_ids = [azurerm_network_interface.exnic.id]
  size                  = "Standard_B2s"
  admin_username        = "adminuser"
  admin_password        = "Password123!"
  source_image_reference {
    publisher = "MicrosoftWindowsServer"
    offer     = "WindowsServer"
    sku       = "2022-datacenter"
    version   = "latest"
  }
  os_disk {
    caching              = "ReadWrite"
    storage_account_type = "Standard_LRS"
  }
}
resource "azurerm_windows_virtual_machine" "WIN11virtualmachine" {
  name                  = var.WIN11computername
  location              = var.node_location
  resource_group_name   = azurerm_resource_group.rg.name
  network_interface_ids = [azurerm_network_interface.win11nic.id]
  size                  = "Standard_B2s"
  admin_username        = "adminuser"
  admin_password        = "Password123!"
  source_image_reference {
    publisher = "microsoftwindowsdesktop"
    offer     = "windows-11"
    sku       = "win11-22h2-avd"
    version   = "latest"
  }
  os_disk {
    caching              = "ReadWrite"
    storage_account_type = "Standard_LRS"
  }
}
Add the virtual machines to create.
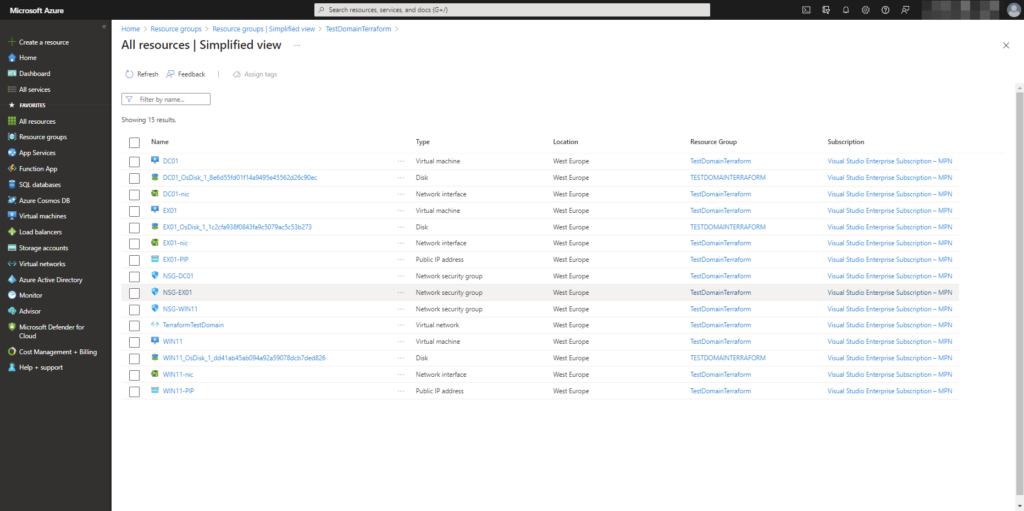
Now you have a terraform file with all the resources needed for a deployment of three virtual machines.
Commands for deployment
To deploy the terraform files, you need to install/download terraform. Once downloaded and installed you can browse with a command line to the folder and run commands:
# check if all resources for connection are available
.\terraform.exe init
# plan deployment and check if files are correct
.\terraform.exe plan
# deploy terraform files
.\terraform.exe apply
Results