Microsoft Entra | Secure Azure AD Tenant
Using Azure Active Directory can be a challenge how to secure this in a good way. Compared to an on-premises network and active directory is the Azure Active Directory more exposed to the internet. In this post we advise some settings and provide a script that setting this up. There are of course a lot possibilities to secure your tenant. I just wrote some down that I thought where needed always.
- Emergency/Break Glass accounts
- Require MFA for administrative roles
- Do not allow Users to grant consent to unreliable applications
- Ensure that password protection is Enabled for Active Directory
- Enable Azure AD Identity Protection sign-in risk policies
- Enable Azure AD Identity Protection User risk policies
- Ensure Security Defaults are disabled on Azure AD
- No Persistent browser sessions for Users
Emergency/Break Glass accounts
When setting up an Azure Active Directory it is recommended to create multiple break glass account, with high privileges, in times of locking yourself out of your tenant. These accounts are not linked to a domain or synchronised to an on-premises domain. You need to use these accounts only at time that a normal high privileged account is not able to be used.
# install module and import module
Install-Module AzureAD -Force
Import-Module AzureAD -UseWindowsPowerShell

# connect to AzureAd
Connect-AzureAd
When we are connected we can set the variables
$BreakGlass1Name = "Emergency Account 1"
$BreakGlass1Username = "LetMein"
$BreakGlass2Name = "Emergency Account 2"
$BreakGlass2Username = "EmergencyAccount"

# password generator
function Get-RandomCharacters($length, $characters) {
    $random = 1..$length | ForEach-Object { Get-Random -Maximum $characters.length }
    $private:ofs = ""
    return [String]$characters[$random]
}
function Scramble-String([string]$inputString) {
    $characterArray = $inputString.ToCharArray()
    $scrambledStringArray = $characterArray | Get-Random -Count $characterArray.Length
    $outputString = -join $scrambledStringArray
    return $outputString
}

# creating passwords
$password = Get-RandomCharacters -length 20 -characters 'abcdefghiklmnoprstuvwxyz'
$password += Get-RandomCharacters -length 4 -characters 'ABCDEFGHKLMNOPRSTUVWXYZ'
$password += Get-RandomCharacters -length 2 -characters '1234567890'
$password += Get-RandomCharacters -Length 3 -characters '!@#$'
$BreakGlass1password = Scramble-String $password

$password = $null
$password = Get-RandomCharacters -length 20 -characters 'abcdefghiklmnoprstuvwxyz'
$password += Get-RandomCharacters -length 4 -characters 'ABCDEFGHKLMNOPRSTUVWXYZ'
$password += Get-RandomCharacters -length 2 -characters '1234567890'
$password += Get-RandomCharacters -Length 3 -characters '!@#$'
$BreakGlass2password = Scramble-String $password

# getting the .onmicrosoft.com address
$upnSuffix = (Get-AzureAdDomain | Where-Object {$_.IsInitial -eq $true}).Name

# creating break glass 1 user
$PasswordProfile = New-Object -TypeName Microsoft.Open.AzureAD.Model.PasswordProfile
$PasswordProfile.Password = $BreakGlass1password
New-AzureADUser -DisplayName $BreakGlass1Name -PasswordProfile $PasswordProfile -UserPrincipalName  $($BreakGlass1Username + "@" + $UpnSuffix) -AccountEnabled $true -MailNickName $BreakGlass1Username | Out-Null

# creating break glass 2 user
$PasswordProfile = $null
$PasswordProfile = New-Object -TypeName Microsoft.Open.AzureAD.Model.PasswordProfile
$PasswordProfile.Password = $BreakGlass2password
New-AzureADUser -DisplayName $BreakGlass2Name -PasswordProfile $PasswordProfile -UserPrincipalName  $($BreakGlass2Username + "@" + $UpnSuffix) -AccountEnabled $true -MailNickName $BreakGlass2Username | Out-Null

# adding break glass 1 user to Global Administrators
$roleDefinition = Get-AzureADMSRoleDefinition -Filter "displayName eq 'Global Administrator'"
$user = Get-AzureADUser -Filter "userPrincipalName eq '$($BreakGlass1Username + "@" + $UpnSuffix)'"
$roleAssignment = New-AzureADMSRoleAssignment -DirectoryScopeId '/' -RoleDefinitionId $roleDefinition.Id -PrincipalId $user.objectId

# adding break glass 2 user to Global Administrators
$user = Get-AzureADUser -Filter "userPrincipalName eq '$($BreakGlass2Username + "@" + $UpnSuffix)'"
$roleAssignment = New-AzureADMSRoleAssignment -DirectoryScopeId '/' -RoleDefinitionId $roleDefinition.Id -PrincipalId $user.objectId

# outputting to console the username and password
Write-Host "User $($BreakGlass1Username + "@" + $UpnSuffix) is created with password: $Breakglass1password "
Write-Host "User $($BreakGlass2Username + "@" + $UpnSuffix) is created with password: $Breakglass2password "
Require MFA for administrative roles
For administrative roles it is recommended to require MFA (Multi Factor Authentication).
Browse to Microsoft Entra.
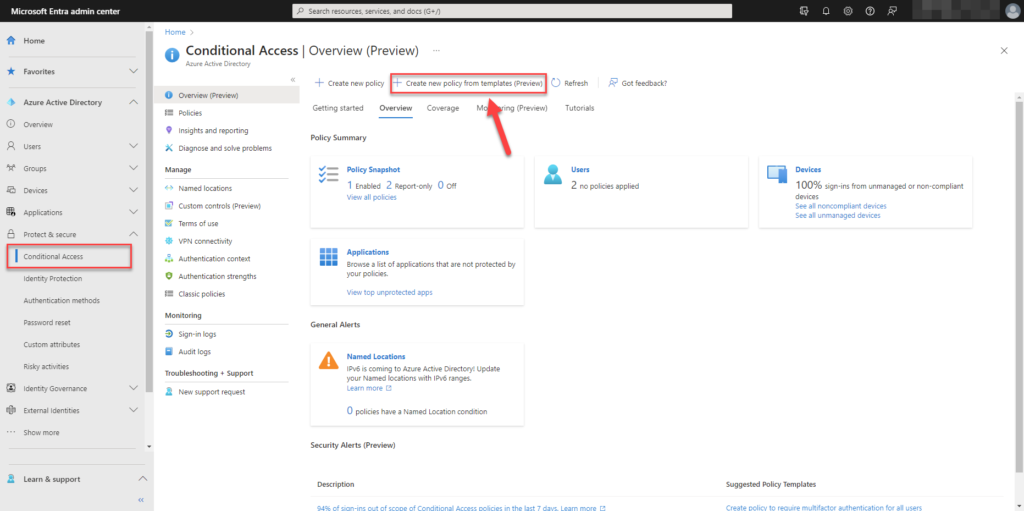
Choose for Create new policy from templates (preview)
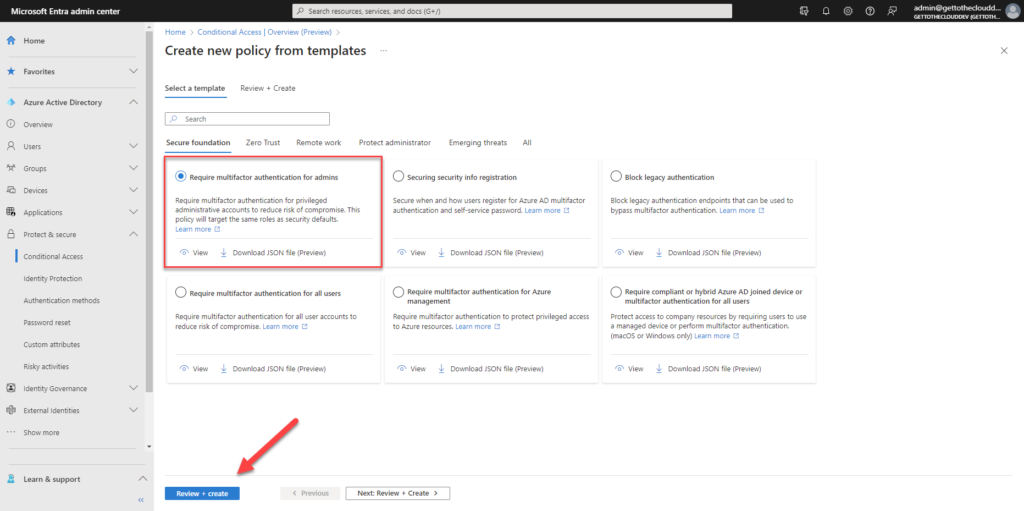
Choose Require multifactor authentication for admins and click Review + create
Select Policy state to On
- Global administrator
- Security administrator
- SharePoint administrator
- Exchange administrator
- Conditional Access administrator
- Helpdesk administrator
- Billing administrator
- User administrator
- Authentication administrator
- Application administrator
- Cloud application administrator
- Password administrator
- Privileged authentication administrator
- Privileged role administrator
These roles will be protected with multifactor authentication after you click Create
Do not allow Users to grant consent to unreliable applications
Browse to the Azure portal

Select the option: Allow user consent for apps from verified publishers, for selected permissions (Recommended)
Ensure that password protection is Enabled for Active Directory
Browsing to Microsoft Entra will bring you to this screen.
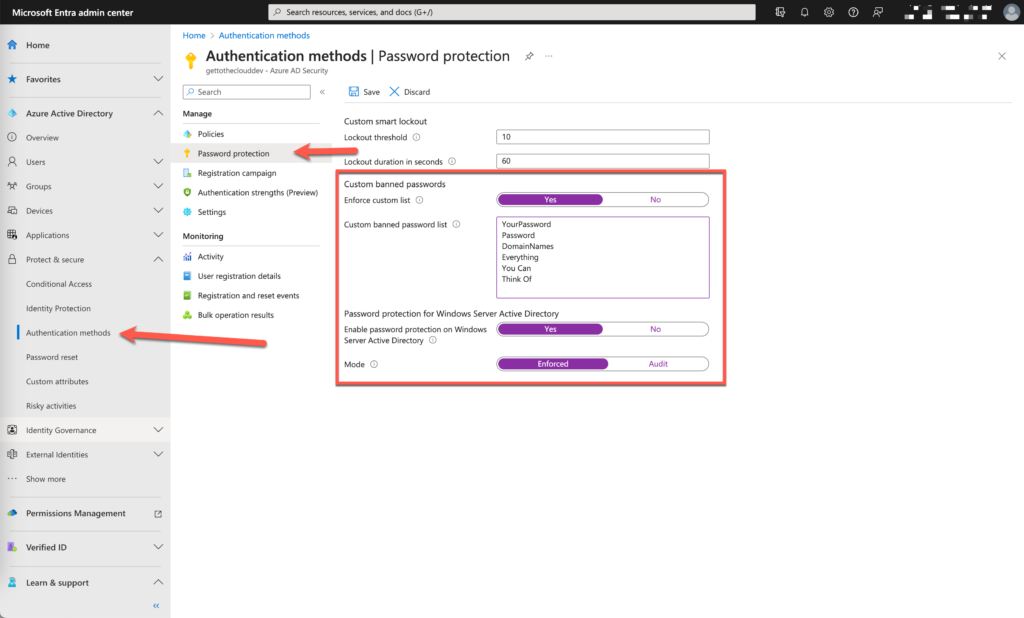
Provide a custom password list and enable it. Enable also Enable password protection on Windows Server Active Directory
Enable Azure AD Identity Protection sign-in risk policies
Browsing to Microsoft Entra enables you to create a sign-in risk policy. A Sign-in risk policy is a security measure that evaluates the risk level of a sign-in attempt and requires additional authentication steps based on that risk level.
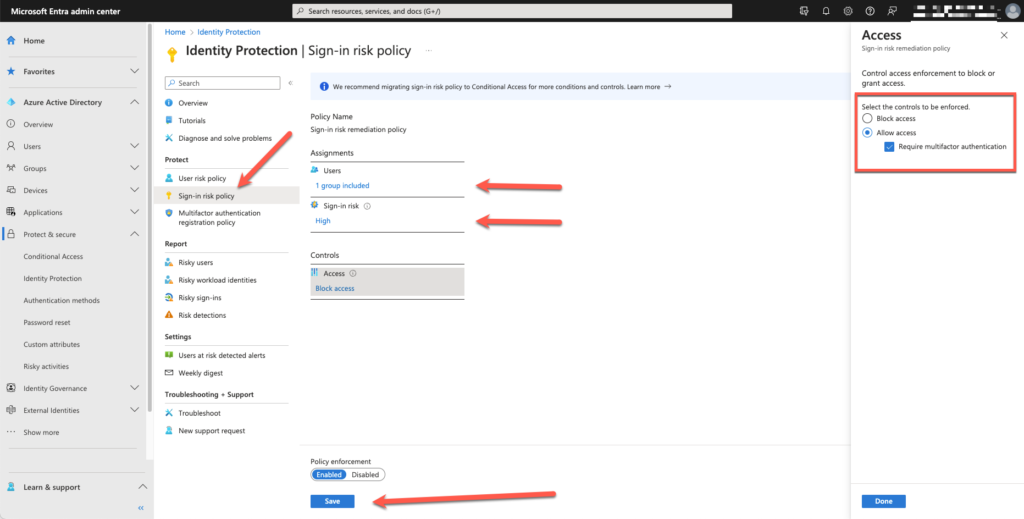
Creating a sign-in risk policy assigned to the specified users or groups. Stating the level of risk and how to handle. For example Block Access or Allow access but require multifactor authentication
Enable Azure AD Identity Protection User risk policies
The User risk policy evaluates the risk level of a user’s identity by analyzing several factors, including their sign-in behavior, device information, and other activity patterns. Based on this analysis, a risk level is assigned to the user’s identity: low, medium, or high.
Browsing to Microsoft Entra will provide you the possibility to setup the User Risk Policy.
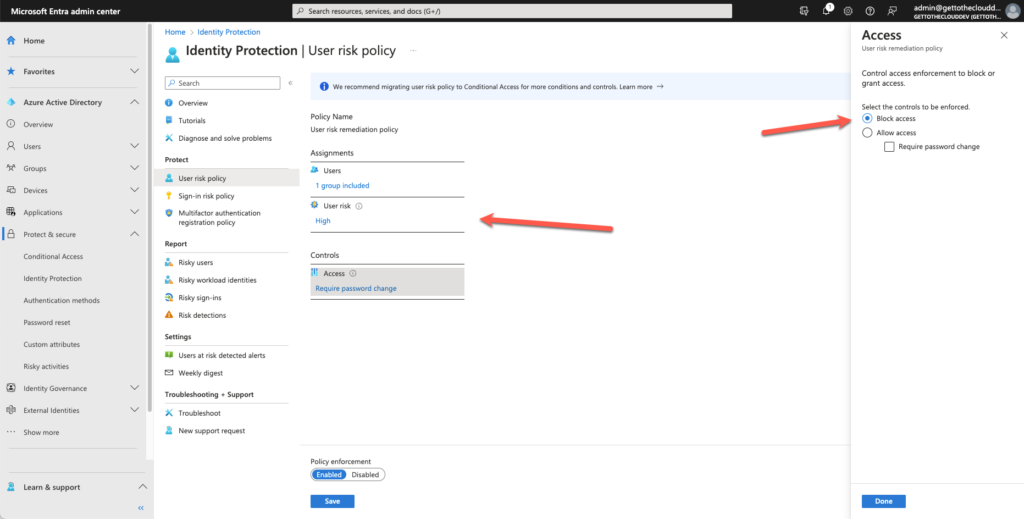
Setting the User Risk to High with a Block access
Ensure Security Defaults are disabled on Azure AD
Browsing to Microsoft Entra will bring you to the Overview of your tenant
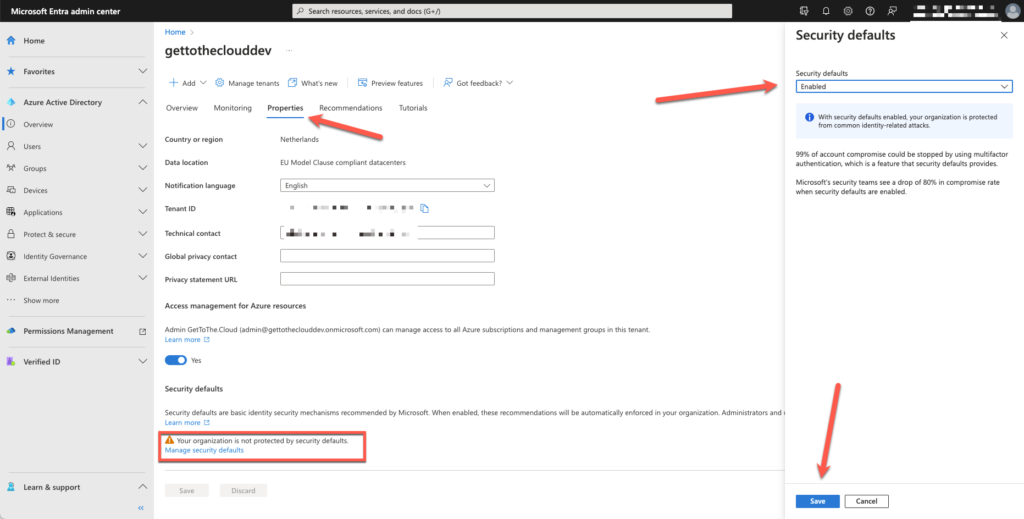
Go to Properties and select Manage security defaults. Set this to Disabled and save
No Persistent browser sessions for Users
There is a template for No persistent browser sessions. By default this is for all users connecting from Unmanaged Devices. This will prevent them to remain signed-in after the browser closed and setting the sign-in frequency to 1 hour.
We use this template.
Browse to Microsoft Entra and choose for Create new policy from templates (Preview)
Search for No Persistent browser session and select the single that pops up.

Change the name if wanted and set Policy state to ON. After you can Create the policy.
Some other tips and tricks
There a lot of lockdown settings to secure you Azure tenant.
- Passwordless authentication -> Azure Active Directory | Authentication Policies – GetToTheCloud
- Privileged Identity Management (JiT access) (will get an own blogpost later)
- Administrative Accounts can only be CLOUD ONLY -> Azure Active Directory | Cloud-Only Administrative Accounts – GetToTheCloud
- Prevent Users from creating Azure AD tenant

